导出报表
Zoho Reports可以让你通过简单的几步来导出表格和报表。你可以将表格/报表导出为多种不同的文件格式,如下图所示:
- CSV - 将报表的基础数据导出为逗号分隔文件。
- Excel - 将报表的基础数据导出为Excel表格文件。
- PDF- 将报表导出为易于打印的PDF文件格式。
- HTML - 将报表导出为HTML文件格式。
- 图片 - 将图表导出为JPG或PNG图片格式(只适用于图表)。
导出报表为CSV文件
按照下面的步骤将报表导出为CSV文件:
- 打开你想要导出的报表。
- 点击导出 > 导出此视图 > 作为CSV。此选项可以将报表/表格的基础数据导出为一个逗号分隔的文件(CSV)。
- 将打开 导出为: 设置 窗口(如下图所示)。
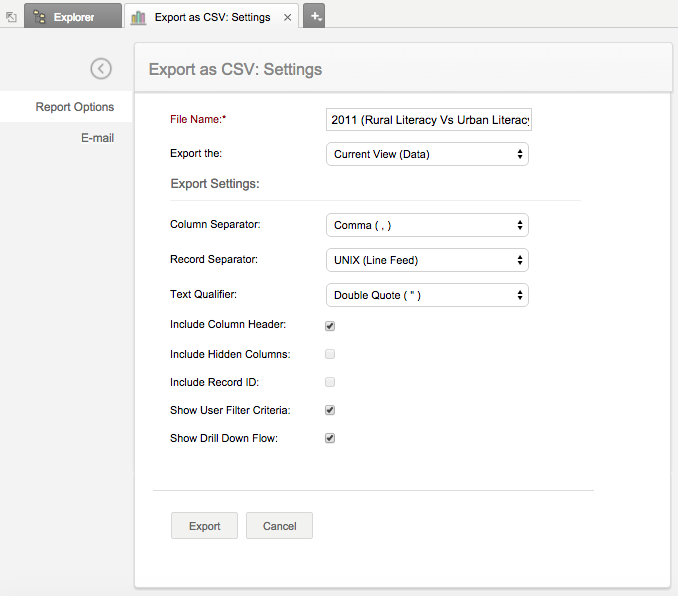
- 文件名称 默认情况下是选中的,指定要导出的文件名称。
- 在导出下拉框菜单中,您可以选择要导出的数据。可用的选项如下:
- 当前视图(数据):此选项适用于表格、图表、数据透视表、表格视图和摘要视图。
- 基础数据:此选项适用于图表、数据透视图、表格视图和摘要视图。
- 当前视图(无格式):此选项适用于数据透视图、表格视图和摘要视图。
- Choose the Column Separator for the exported file, from the column seperator drop down. Available options are Comma (,), Tab Semicolon (;) and Space Pipe (I). By default Comma will be selected.
- Choose the Record Separator for the exported file. Available options are UNIX Line Feed, Windows (Carriage Returns + Line Feed) and MAC(Carriage Return). By default UNIX Line Feed will be selected.
- Choose the Text Qualifier for the exported file. Available options are Single Quotes and Double Quotes. By default Double Quotes will be set as text qualifier.
- Select Include Column Header to include the column header in the exported file.
- Select Include Hidden Columns to include the hidden column in the exported file (applicable only for tables and tabular views).
- Select Include Record ID to include the record ID in the exported file (applicable only for tables and tabular views).
- Select Show User Filter Criteria to include the user filter criteria as a label in the exported file, this will be applicable only if you have applied a user filter in your report. (applicable only for chart, pivot and summary views).
- Select Show Drill Down Flow to show the drill down path, this will be applicable only if you have set a drill down path in your report (applicable only for charts)
- Click Export to export the report.
导出报表为Excel文件
Follow the below steps to export the report as a Excel file.
- Open the report that you want to export.
- Click Export > Export this View > As Excel. This option exports the underlying data of a report/table as a Excel file.
- The Export as Excel: Settings window opens (as shown below).
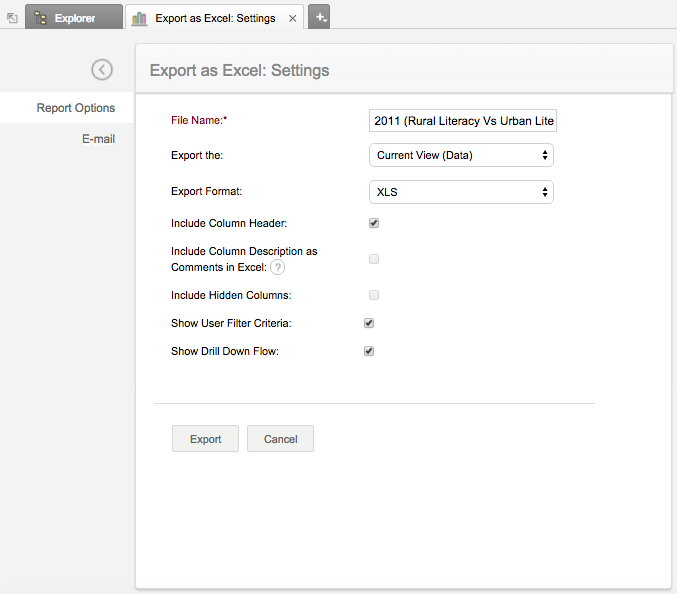
- File Name is selected by default and it specifies the name of the file that is to be exported.
- In Export thedrop-down menu you can specify how the data is to be exported. Available options are:
- Current View (Data): This option is applicable for Tables, Charts, Pivot, Tabular View and Summary View.
- Underlying Data: This option is applicable for Charts, Pivot, Tabular View and Summary View.
- Current View (Without Formatting): This option is applicable for Pivot, Tabular View and Summary View.
- Select the file extension from the Export as drop down menu. Available options are XLS and XLSX. By default, XLS will be selected.
- Select Include Column Header to include the column header in the exported file.
- Select Include Column Description to include the column description as comments in the corresponding column headers of the exported file (applicable only for tables and tabular views).
- Select Include Hidden Columns to include the hidden column in the exported file (applicable only for tables and tabular views).
- Select Show User Filter Criteria to include the user filter criteria as a label in the exported file. This will be applicable nly if you have applied a user filter for your report. (applicable only for charts, Pivots and summary views).
- Select Show Drill down Flow to show the drill down path. This will be applicable only if you have set a drill down path. (applicable for charts)
- Click Export to export the report.
导出报表为PDF文件
Follow the below steps to export the report as a PDF (Printer Friendly) file.
- Open the report that you want to export.
- Click Export > Export this View > As PDF. This option exports the report/table in a PDF file format.
- The Export as PDF: Settings window opens (as shown below).
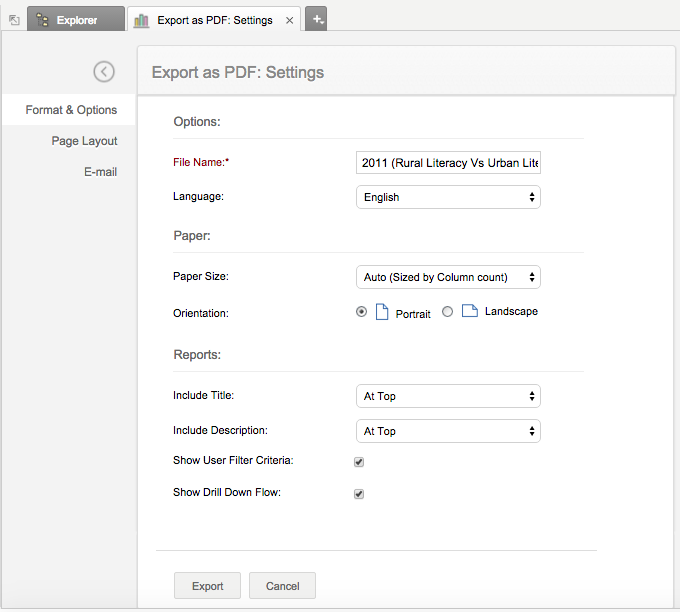
- File Name is selected by default and it specifies the name of the file that is to be exported.
- Specify the Language in which you wish to export the data. Supported languages are English, European, Chinese, Japanese and Korean.
- Specify the Paper Size for the PDF to be exported. Available options are
- Auto (Sized by Column count)
- Letter (8.5” x 11)
- Legal (8.5” x 14)
- Tabloid (11 x 17)
- A3
Note
- When size of the PDF is set to Auto, the size will be modified to fit the content. When choosing other options, ensure that the column you are exporting can fit within the page to avoid content getting collapsed.
- Specify the Page Orientation - Portrait or Landscape
- Specify where you want to include the title in the exported file.
- Specify where you want to include the description in the exported file.
- Select Show User Filter Criteria to include the user filter criteria as a label in the exported file, this will be applicable only if you have applied a User Filter in your report. (applicable for charts, pivots and summary views).
- Select Show Drill down Flow to show the floe of the drill down path. This will be applicable only if you have set a drill down path. (applicable for charts)
In the Export as PDF window, you can choose Page Layout tab on the left, below Format & Options to customize the document that you will be exporting.
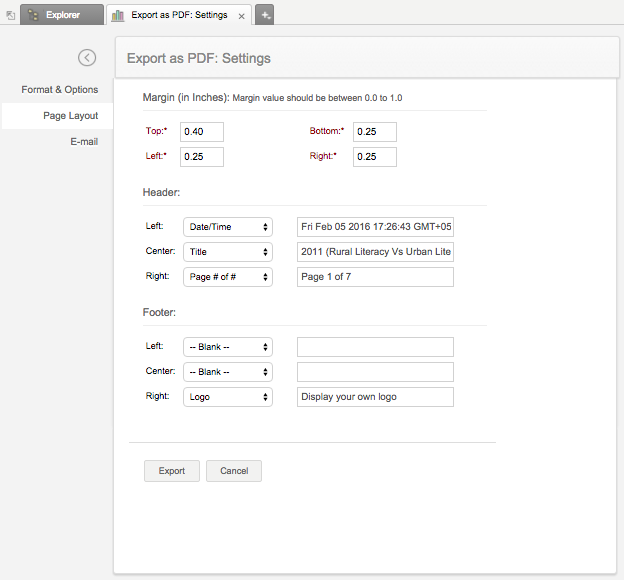
In this tab, you can specify the margin width and also further customize the header and footer of the document by selecting the following options in your Header and Footer at the left, center and right positions to suit your needs.
- Blank – No content will be displayed in the specific position.
- Title – Title of the report will be displayed in the specific position.
- Date/Time – Date and time of export will be displayed in the specific position.
- Page # - Page number will be displayed in the specific position.
- Page # of # - Page number of total number of pages will be displayed in the specific position.
- Custom Text – The text that you specify will be displayed in the specific position.
- Logo – Your custom logo will be displayed in the specific position. This option will be available only when you have added a custom logo in your account (available only for paid accounts).
Note
- You can print the views by exporting them into a printer friendly PDF file.
导出报表为HTML文件
Follow the below steps to export the report as a HTML file.
- Open the report that you want to export.
- Click Export > Export this View > As HTML. This option exports the report/table in a HTML file format.
- The Export as HTML: Settings window opens (as shown below).

- File Name is selected by default and it specifies the name of the file that is to be exported.
- In Export the option you can specify how the data is to be exported. Available options are:
- Current View (Data): This option is applicable for Tables, Charts, Pivot, Tabular View and Summary View.
- Underlying Data: This option is applicable for Charts, Pivot, Tabular View and Summary View.
- Current View (Without Formatting): This option is applicable for Pivot, Tabular View and Summary View.
- Choose the position where you wish to include the tittle.
- Choose the position where you wish to include the description.
- Select Include Column Header to include the column header in the exported file.
- Select Include Hidden Columns to include the hidden column in the exported file (applicable for tables and tabular views).
- Select Show User Filter Criteria to include the user filter criteria as a label in the exported file, this will be applicable only if you have applied a user filter to your report (applicable for charts, pivots and summary views).
- Select Show Drill Down Flow to show the drill down path, this is applicable if you have set the drill down path (applicable for charts).
- Click Export.
导出报表为图片文件
Export as Image option is available only for Charts. You can export a chart in a PNG or JPG file format.
- Open the chart that you want to export.
- Click Export > Export this View > As Image.
- The Export as Image: Settings window opens.
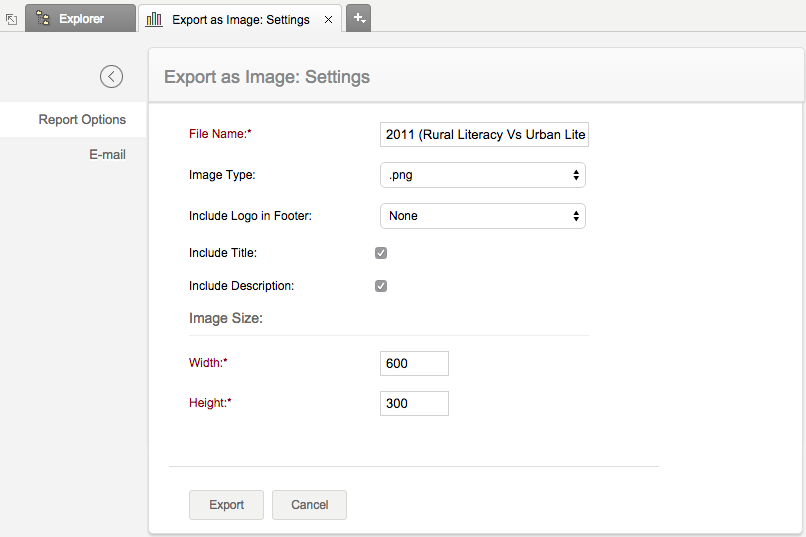
- File Name is selected by default and it specifies the name of the file that is to be exported.
- Select the type of the image. Available options are .png and .jpg
- Choose the position where you wish to insert the logo.
- Select Include Title to include the title in the exported file.
- Select Include Description to include the description.
- Specify the Image Size.
- Click Export.
注意 - 邮件发送报表
你还可以通过点击报表选项页签下的邮件选项来通过邮件发送报表给你的同事。参考邮件 - 帮助文档了解更多内容。