Contact Management
At Zoho Campaigns, you can import contacts from various sources such as excel sheets, CSV files and Google spreadsheets and manage them by maintain under mailing lists. You can view the contact history to check the number of sent campaigns for a specific contact and the history of that contact pertaining to different lists.
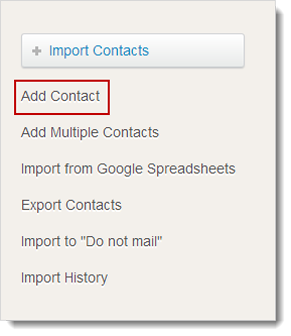
Add Contacts
You can add contacts and associate to a mailing list, manually. Apart from basic details, you can also store additional information. To add contacts, follow the steps below:
- Go to Contacts --> Contact Management.
- In Contact Management page, click Add Contact option (present on the right hand side).
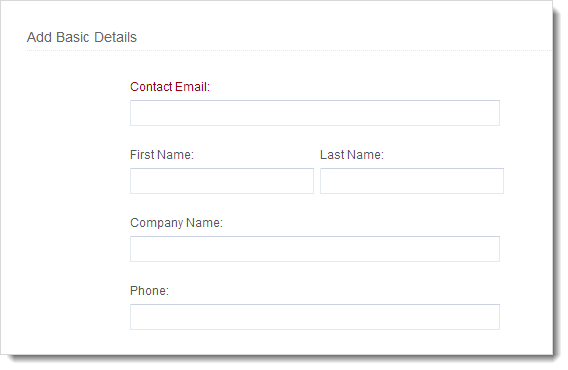
- Enter the basic details required in the given box.
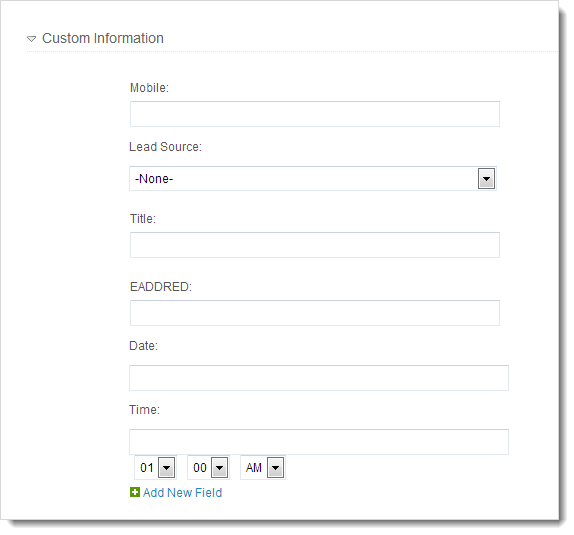
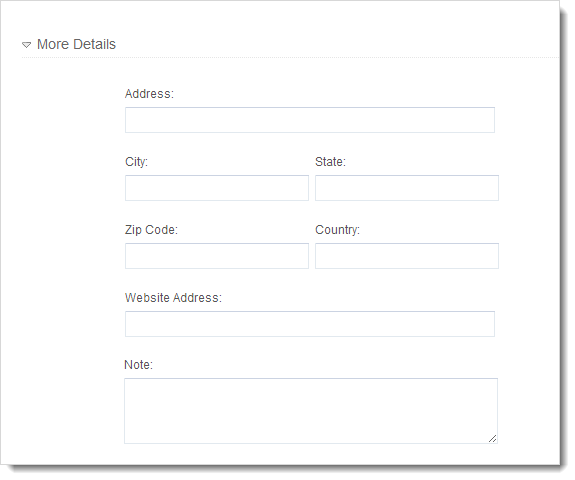
- You can also add Custom Fields, More Details and Account Information by clicking related links.
- Associate the contact to a mailing list by selecting the lists.
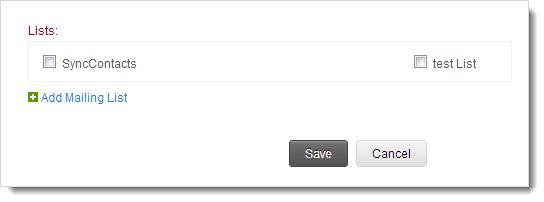
- Click the Save button to confirm.
Note
- Contact Email is a mandatory field.
- Association of contacts to a mailing list is mandatory.
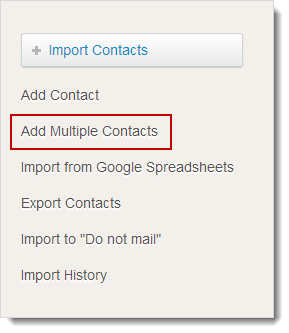
Add Multiple Contacts
This is a quick option where you can add a maximum of 20 contact emails and associate to a list. To add multiple contacts, follow the steps below:
- Go to Contacts --> Contact Management.
- In Contact Management page, click Add Multiple Contacts (present on the right hand side).
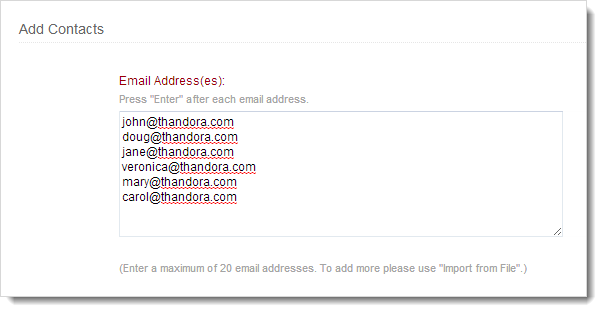
- Enter multiple email addresses in the box given. Press Enter key to separate the email addresses from each other.
- Associate contacts to a mailing list by selecting the lists.
- You can also create a new mailing list by clicking the link Add Mailing List and associate the contacts to new mailing list.
- Click the Save button to confirm.
Note
- You can add contacts to the maximum of 20 email addresses.
- If you want to import high volume of subscribers i.e. more than 20 contacts, we recommend you to make use of Import from File option.
What are the file formats accepted to import contacts?
You can Import Contacts using the spreadsheets such as
- Excel documents (.xls, .xlsx)
- Comma separated value files (.csv)
Note
- We do not support text file to import contacts.
- Email address is a mandatory field.
What is an Excel file?
Excel (.xls and .xlsx), are spreadsheets where data is arranged in rows & columns and each record is stored in a single row with fields in different columns. An ideal excel sheet would look like this:
The first row is the header which defines the field names, in this case contact Email, First Name, etc. Therefore, each row is a single record in the spreadsheet which has corresponding name and email address.
What is a CSV file?
CSV files, as the name suggests, are files where data is listed as one record per line and each field separated by a “comma”. A simple contact.csv files would look like this:
1. Header in CSV file
The first line is the header which defines the field names, in this case contact Email, First Name, etc. Therefore, each line is a single person in your contacts list with a corresponding name and email address.
2. Line breaks in a CSV file
It is important that a CSV file must have one record per line; otherwise, the system will not accept the CSV file.
3. Comma in a CSV file
Make sure the email addresses and other fields are separated by comma in a CSV file. When 2 fields are not separated by “comma”, it prevents the import of file.
What are the problems incurred while Importing Contacts?
When you are trying to import file to your Zoho Campaigns account, our system may show an error message. This is due to the fact that there is an error in your file which is preventing us to import it. You need to take a second look at the possible scenarios where an error is preventing the file to upload.
Below are the different scenarios which can be prevented easily, let’s take a look at these possibilities where error could incur.
What are the invalid pattern seen in import file?
- Missing the “@” symbol – For example, jane.doegmail.com is missing the “@” symbol.
- Missing the Period symbol – For example Patrick@yahoocom is missing the period.
- Spacing in File – This could be due to the extra space present in the beginning of contacts. The best way to prevent this error is to make use of TRIM function in Excel to remove all spaces from text.
- Email address with more than 6 characters after the last dot, For example, jane.doe@zylker.incostica
- Non-English characters - If your list of subscribers contains non-English characters.
Tips to remember while importing file (Excel File)
- First row of the given file will be treated as field names.
- Column Headers should not be more than 255 characters.
- File size should not exceed 30 MB.
- Avoid using hyperlinks in email addresses.
- Add email addresses under appropriate column headers only.
- In case of Excel file, the supported format should be MS Excel 95 and above.
- While importing an excel file, it is suggested to add contacts on one sheet.
- Unexpected errors may occur if the XLS file contains any special controls like combo filters or images embedded within it.
- Check box value should be 1 or 0
- Date values must be in MM/dd/yyyy format. Dates in any other format will be ignored.
- Date Time values must be in MM/dd/yyyy hh:mm:ss format. Date Time values in any other format will be ignored.
- By default, the character encoding is UTF-8 (Unicode). Make sure you provide the correct character encoding if your import file requires a different character encoding.
- It is recommended that you test your import with a sample file before you import the actual data.
- Though we support excel file, there is a possibility that it may not work due to an unknown error. We suggest to convert excel file to .CSV file and import again.
How to import contacts from a file?
To import contacts from a spreadsheet, follow the steps below:
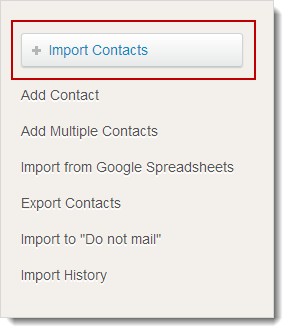
- Go to Contacts --> Contact Management.
- In Contact Management page, click Import Contacts button (present on the right hand side).
- In Import Multiple Contacts page, click Choose File button to select the file you want to upload.
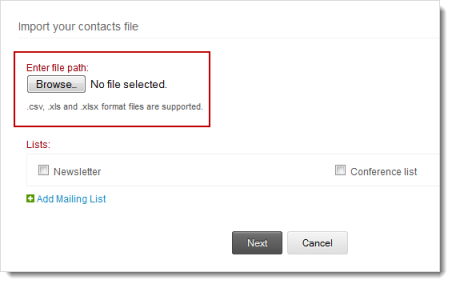
- Associate the contact file to a mailing list by selecting the list.
- You can also create a new mailing list by clicking the link Add Mailing List and associate the contacts to new mailing list.
- Click the Next button which will take you to Map your Fields page.
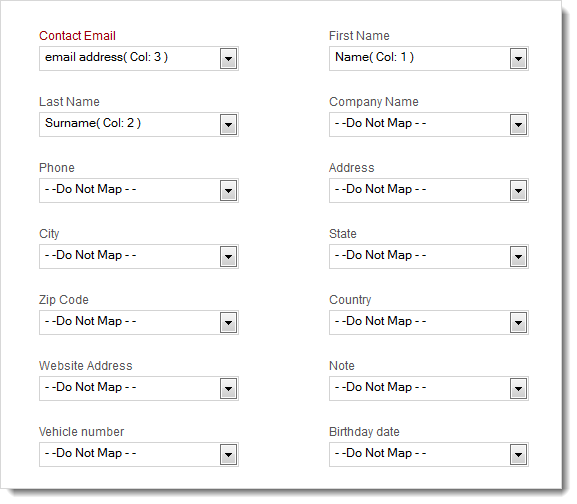
- In Map your Fields page, you can map the column headers of your file to the fields present in the mailing list.
- Click Import button.
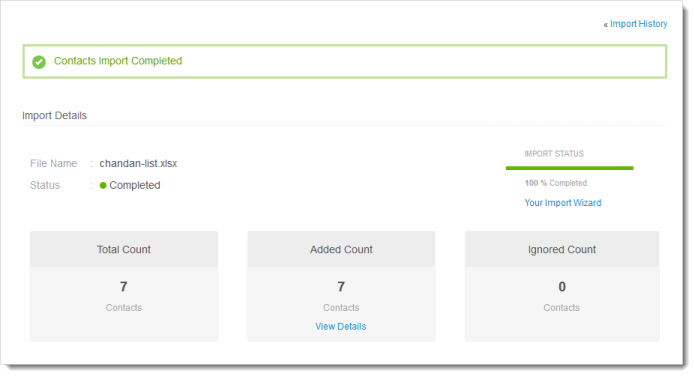
Once the import of contacts is done, you can view the import details in the import history page.
How can I view Import History?
After importing contacts, you can view the report generated on the basis of imported contacts. Luckily, Zoho campaigns make it easy to view the entire history of imported contacts in few easy steps.
Here you can view the number of newly added contacts, Duplicate Contacts, Ignored contacts, etc. and the View Details shows the detailed report of contacts related to their category.
To view Import History, follow the steps below:
- Go to Contacts --> Contact Management.
- In Contact Management page, click Import History option (present on the right hand side).
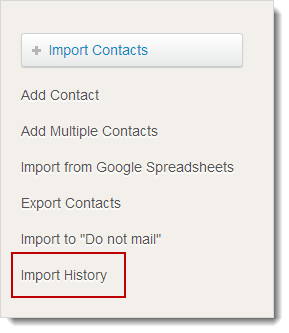
- You can view the Import history of contacts arranged in chronological order.
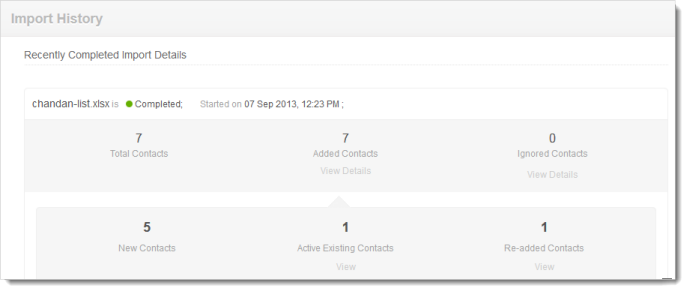
- To view the detailed report, click View Details. This will segregate the contacts as
- Total Contacts
- Added Contacts
- Ignored Contacts (comprises different scenarios for ignored contacts.)
Ignored Contacts
| Status | Description |
| Bounced | Contact bounced from reaching the inbox or email addresses do not exist. |
| Blocked | Contacts blocked by Zoho Campaigns. |
| Do-Not-Mail | Contacts moved to Do-not-mail registry by campaign user/subscriber. |
| Group Email(s) | Contacts generic in nature. For e.g. info@, administrator@, careers@, service@, support@, etc. |
| File Duplicate(s) | Contacts present more than once in the file. |
| Invalid Pattern | Contacts with invalid pattern. For e.g. johngmail.com, jane@aol, ted@zillumcom. |
| Empty Email | Contacts with missing email address field. |
| Other Errors | Contacts categorized as miscellaneous and don’t fall under above mentioned categories. |
why group email addresses are not accepted while importing?
Zoho campaigns restrict the import of group email address (es) such as info@zylker.com , support@ zylker.com , admin@ zylker.com and help@ zylker.com , etc. The purpose of preventing these email address is because these have a high probability of email getting landed in the spam folder.
Import Contacts from Google Spreadsheets
You can import your contacts from Google spreadsheets present in your Google Docs. Import of contacts is relatively easy by integrating the Google account to Zoho Campaigns. Learn how to integrate Google account with Zoho Campaigns.
To import contacts from Google spreadsheet, follow the steps below:
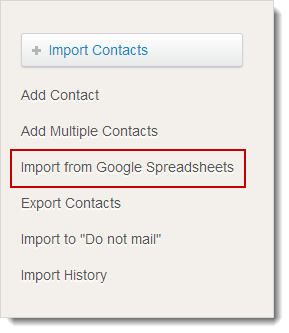
- Go to Contacts --> Contact Management.
- In Contact Management page, click Import from Google Spreadsheets option (present on the right hand side).
- In Import from Google Spreadsheets page, select the file and sheet number from the drop-down menu.
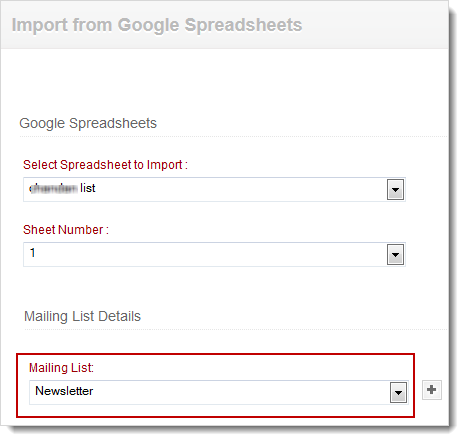
- Also, select the mailing list; you want to associate the Google spreadsheet to import contacts.
- You can also create a new mailing list by clicking the “+” sign to associate the contacts to new mailing list.
- Click the Save & Continue button which will take you to Map your Fields page.
- In Map your Fields page, you can map the column headers of your file to the fields present in the mailing list.
- Click the Import button.
Once the import of contacts is done, you can view the import details in the import history page.
Note
- When the contact volume is high, it gets saved in more than one sheet, so do not forget to import contacts from the second sheet.
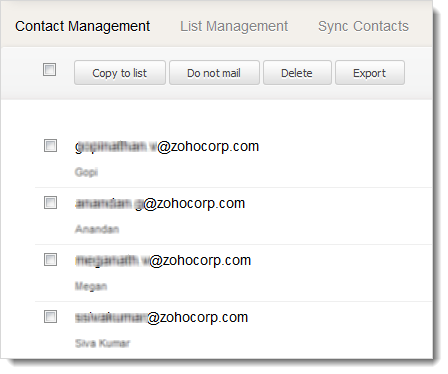
Edit Contacts
You can modify the information present in a contact by editing the contact and make the necessary changes in the contact. To edit a contact, follow the steps below:
- Go to Contacts module --> Contact Management subtab.
- Click the contact email, you’d like to edit.
- Now, click the Edit button present at the top left corner.
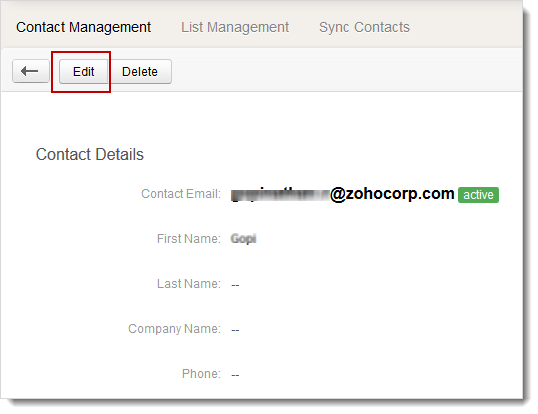
- In Edit Contact page, make the changes, you’d like to see.
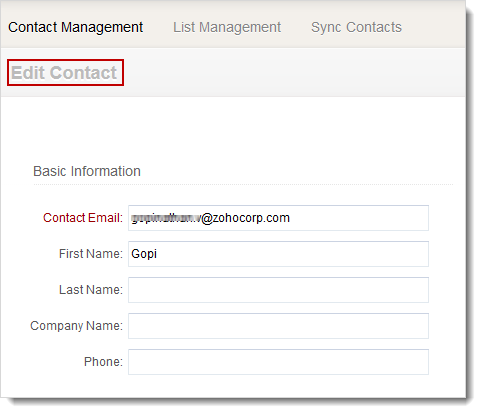
- Click the Save button.
Filter contacts based on user
In Manage Contacts, you can view the list of contacts present in your organization. You can also sort contacts by filtering them based on certain criteria. We’ll take a look at the different ways to view contacts based on filtering system.
- Go to Contacts --> Manage Contacts.
- In Contact Management page, you can find the filter icon (
 ) present on right hand side of the bar.
 - Click the Filter icon and select the user to filter the contacts.
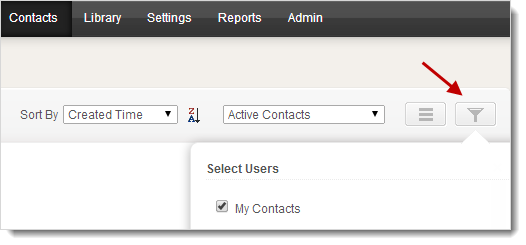
- Click the Apply button to view the contacts.
Sort contacts
You can sort contacts by clicking the menu icon present in the ribbon situated beneath Manage Contacts.
- Go to Contacts --> Manage Contacts.
- In Contact Management page, you can find the Menu icon present on right hand side of ribbon.
- Click the Menu icon to view the Sort option.
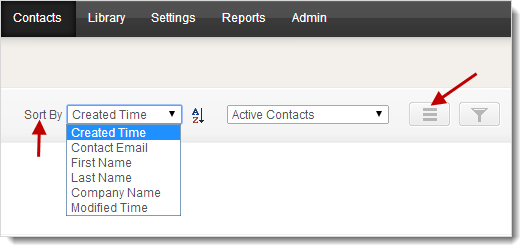
Now, you can sort the contacts based on contact email, first name, last name, company name, etc. in alphabetical order.
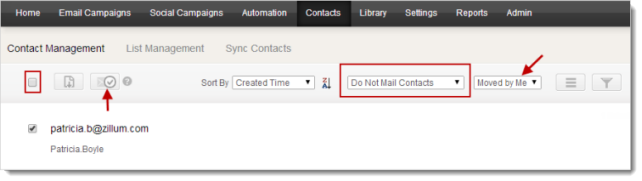
Move do-not-mail contacts to active list
You can retrieve their contacts which were moved to do-not-mail registry by them.
- Go to Contacts module --> Manage Contacts.
- In Contact Management page, you can find the Menu icon (
 ) present on the right hand side of ribbon.
 - Click the Menu icon to view the drop-down menu and then select the Do-not-mail Contacts and Moved by Me from the drop-down menu.
- This will list down the contacts moved to do-not-mail registry by you.
- Select the contact, you want to move and click the Mark as Active icon.
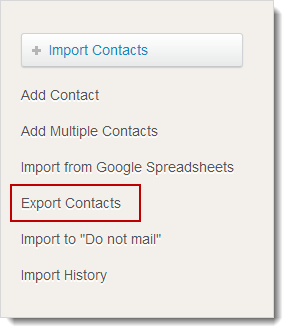
Export Contacts
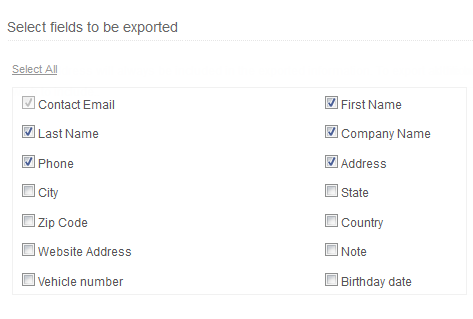
You can export your contacts from Zoho Campaigns to your desktop in different formats such as CSV, .XLS, JSON, etc. This provides the convenience of exporting contacts in a format which is supports your system configurations. Not only this, you can categorize your export on the basis of whether it is active contacts, bounced contacts, recently added, etc. You can also select the fields to be shown such as first name, company, country, etc to be exported along with the email address.
To export contacts from Zoho Campaigns’ contact module, follow the steps below:
- Go to Contacts --> Contact Management.
- In Contact Management page, click Export Contacts (present on the right hand side).
- In Export Contacts page, select the type of contacts to be exported (e.g. Active Contacts).
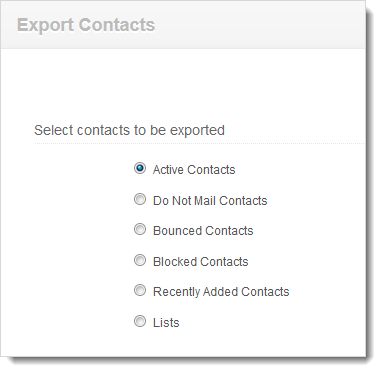
- Also, select the fields you want to export along with the related contact(s) and provide a file name as reference for the export of contacts.
- Now, export contacts by clicking the format type such as CSV, .XLS, JSON.

Once done, you can view the exported contacts under the download section of your desktop.
Delete Contacts
At times, you find duplicate contacts present in your imported contacts list. You can delete such contacts by selecting the contacts, individually. To delete a contact, follow the steps below:
- Go to Contacts --> Contact Management.
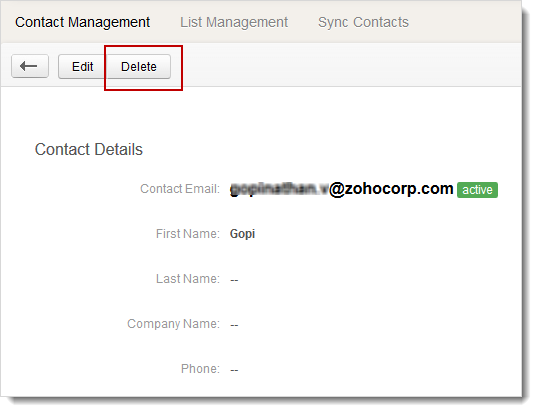
- Select the contact email, you’d like to delete.
- Now, click the Delete button present at the top.
Alternately, you can delete the contact by following the steps below:
- Select the contact email, you’d like to delete.
- In Contact page, click the Delete button present at the top.
- This will prompt a message to confirm that you want to delete the contact.
- Click OK to confirm.
Import to Do-Not-Mail Registry
There are organizations who store data containing contacts in a separate file and that they don't wish to email in future. In such cases, to ensure those contacts are not disturbed, this feature will be helpful for corporations to directly import them to Do-Not-Mail Registry and keep them as a separate list while signing up for Zoho Campaigns. You can import a file directly to Do-Not-Mail Registry by following the steps given below:
- Go to Contacts --> Contact Management.
- In Contact Management page, click Import Contacts on your right hand side.
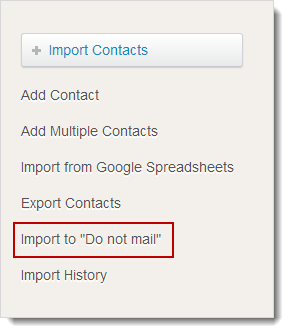
- This will take you to Import Multiple Contacts page; click Import to Do-Not-Mail (present on the right hand side).
- Click OK to confirm.
- In Import Multiple Contacts to Do-Not-Mail page, click Choose File button to select the file you want to upload.
- Click the Next button which will take you to Map your Fields page.
- In Map your Fields page, you can map the column headers of your file to the fields present in the mailing list.
- Click the Import button to import the contacts to Do-Not-Mail Registry.
The reason we ask for a confirmation is to ensure that the import is happening with your full knowledge. The moment your contacts are imported to Do-Not-Mail, no one from your organization will be able to email these subscribers.
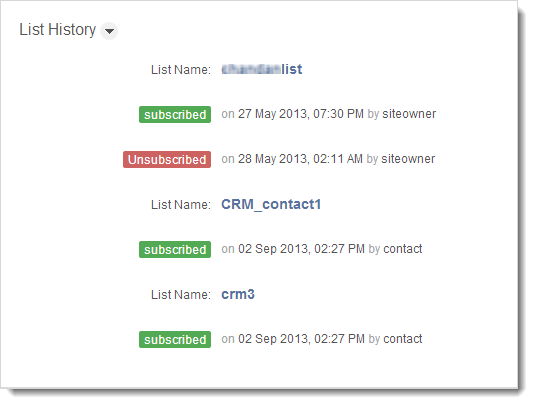
View Contact History
You can view the past of contacts such as number of lists associated with the contact, the number of times subscribed and unsubscribed from a list, and by whom (site owner or subscriber) the contact was subscribed. To view contact history, follow the steps below:
- Go to Contacts --> Contact Management.
- Click the contact email; you’d like to view the history.
- Now, scroll down and click List History.