Scroll down or click to view a topicup
What is a Sign-up based Autoresponder ?
A Sign-up based Autoresponder lets you create a series of automated email messages to be sent to subscribers joining your mailing list via sign-up form/import/sync with other services. The emails could be anything ranging from a welcome email to information relevant to their area of interest. Lets see how to set up a sign-up based Autoresponder and explore the various scenarios you may encounter while trying to create one.
To create a Sign-up based Autoresponder:
- Go to the Automation tab --> Autoresponders.
- Click the Create Autoresponder button present on the right hand side.
- In the Create Autoresponder page, click Sign-up.
- This will take you to the create page where you need to enter/add the following information:
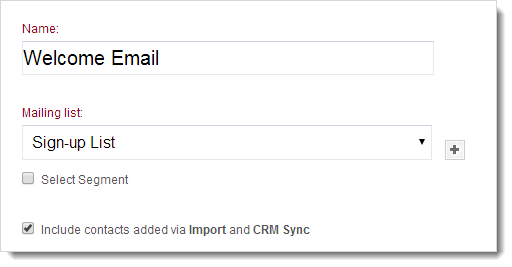
- Name - Give a name to the Autoresponder for future reference.
- Mailing List - Select the Mailing List that will receive emails triggered by the Autoresponder.
- Select Segment - Choose a specific segment from the drop-down menu.
- Select the checkbox to include contacts newly added via import or sync from other services such as CRM.
- Click Create button to proceed. This will take you to the next page, where you create the Autoresponder message .
Creating Messages for the Autoresponder
In an Autoresponder, you can add a maximum of 50 automated messages and send it to subscribers joining your mailing list.
- Click the Create Message button.
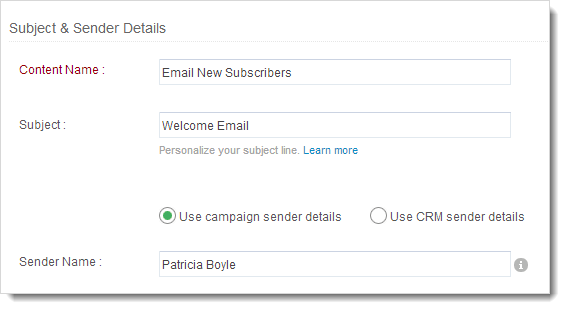
- Now, add message content such as basic details, layout etc.
- Once the content is ready, you can send the message for review.
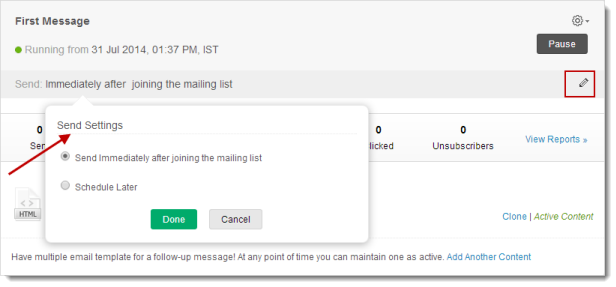
- After the message has been reviewed, click the Send Settings button. You may choose to send immediately or schedule it later.
- Click the Start Now button.
Sending Autoresponders to Existing Contacts
Lets take an example; an Autoresponder message is created that will be received by subscribers 4 days after signing up/being added to the mailing list. Now, if a contact is added to that list on August 4th, that subscriber would be receiving the message on August 8th.
But what about contacts which existed on the list prior to the creation of the Autoresponder ? Even if these contacts meet the criteria defined for the Autoresponder, they will never receive the message. You might want to send Autoresponders to pre-existing contacts who were already on the mailing list prior to the creation of Autoresponder.
For such contacts, we have the option of sending Autoresponder messages by clicking the Send to Missed Contacts option. You can find the Send to Missed Contacts option under Settings section of an Autoresponder message.

Note: A sign-up based Autoresponder triggers based on when the subscribers was added to a mailing list.
Schedule an Autoresponder Message
You can edit the timing of an Autoresponder message as follows:
- Go to Autoresponders subtab, and click the Autoresponder.
- Now, go to the message and click the Edit icon related to Send Settings.
- You’ll get a pop-up page to schedule the timing.
- Click the Done button to confirm.
Note
- Any change in timing may take upto 24 hours to be updated.
- An Autoresponder message may take a maximum of 30 minutes from its scheduled time to be delivered to the recipient.
- In sign-up based Autoresponder, schedule after one day means exactly 24 hours since subscriber sign up to the mailing list.
Edit Autoresponder Message Content
You can edit Autoresponder message content as follows:
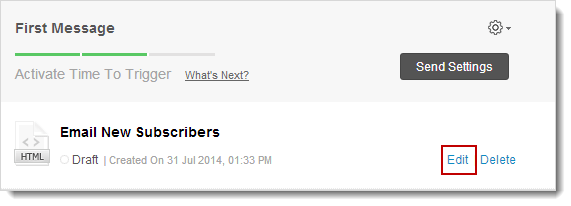
- Go to Autoresponders subtab, and click the Autoresponder you wish to edit.
- Now, go to the message and click the Edit link to make necessary changes.
- Click the Proceed button.
Note: You can not edit content for an active Autoresponder. However, you can clone the Autoresponder content and edit it.
Clone Autoresponder Message Content
You can clone an Autoresponder message content as follows:
- Go to Autoresponders subtab, and click the Autoresponder to be cloned.
- Now, go to the message and click the Clone link.
- You’ll get a pop-up page to enter the basic details.
- Click the Save button to confirm.
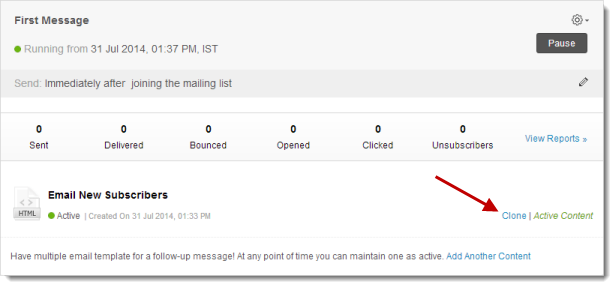
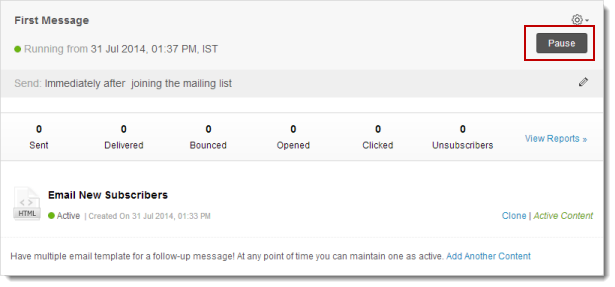
Pause Autoresponder Message
You can pause a specific message within the Autoresponder as follows:
- Go to Autoresponders subtab, and click the Autoresponder to be paused.
- Click the Pause button present in the message content.
- Click OK to confirm.
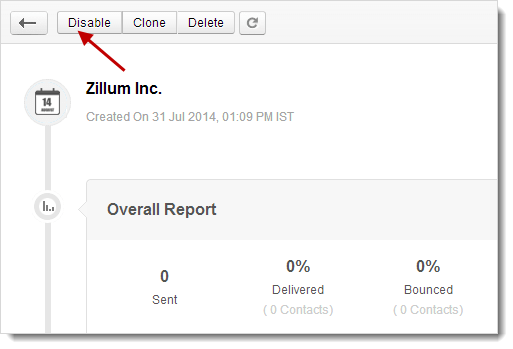
Disable Autoresponder
Disabling an Autoresponder will disable all Autoresponder messages.
- Go to Autoresponders subtab, and click the Autoresponder to be disabled.
- Click the Disable button on the top of page.
- Click OK to confirm.
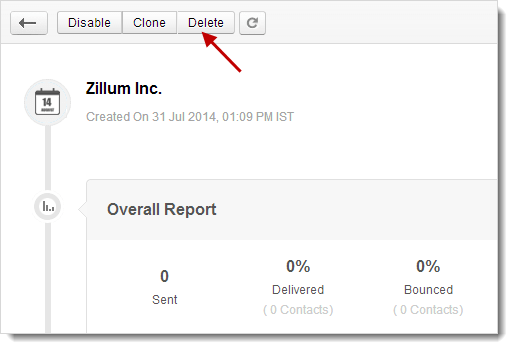
Delete Autoresponder
You can delete an Autoresponder as follows:
- Go to Autoresponders subtab, and click the Autoresponder.
- Click the Delete button on the top of page.
- Click OK to confirm.
Edit Recipients
You can include or exclude the recipients added via import and sync with other services by following the steps given below:
- Go to Autoresponders subtab, and click the Autoresponder in question.
- In the Autoresponder message page, go to Autoresponder Details present on the right hand side.
- Click the Edit icon to edit the recipients.
- You’ll get a pop-up page to select the contacts added via import as well as sync with other services.
- Click the Save button to confirm.
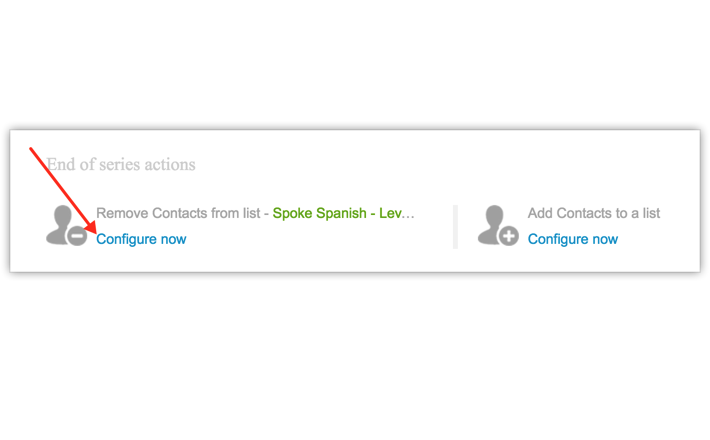
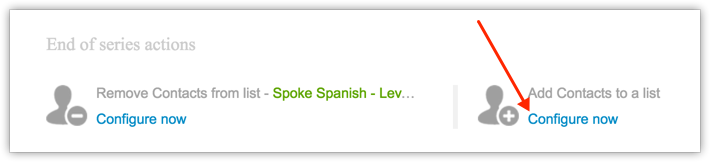
End of series Actions
Once the Autoresponder message series comes to an end, you can take further actions on the contacts present in the mailing list to which Autoresponder was sent. You can either remove contacts from an existing mailing list or associate the contacts from an existing mailing list to a new mailing list.
To remove contacts from mailing list, follow the steps below:
- Go to Automation --> Autoresponders
- Select the Autoresponder to which you want to choose actions
- This will take you to the Autoresponder message page, scroll down to the end of the page
- Under End of Series Actions, navigate to Remove Contacts
- Click the Configure now link and choose your preferences (immediately or later)
- Click Save to confirm
To move contacts to a new mailing list, follow the steps below:
- Go to Automation --> Autoresponders
- Select the Autoresponder to which you want to choose actions
- This will take you to the Autoresponder message page, scroll down to the end of the page
- Under End of Series Actions, navigate to Add Contacts
- Click the Configure now link and choose your preferences such as mailing list and when you want to move contacts (immediately or later)
- Click Save to confirm
Note
- You can click the + icon to add a new mailing list and then move contacts to the new one
- End of series related actions are also applicable to Date-field based Autoresponders (one-off) and Calendar Based Promotions
- The end of series related actions take place after the last message is sent to recipient. In case, you have schedule the action, the time duration will be based on last message sent to the recipient.
- You can view the contacts which were removed or added to a new mailing list by clicking the View Reports link.
- You can enable/disable the end of series related actions by clicking the Enable/Disable link
