Quick Linksup
In email marketing, there are activities which are repetitive in nature and takes your valuable time. In order to simplify those tasks, Zoho Campaigns has come up with a new process called Workflow automation. Let us try to understand about the workflow process and it's relevance in marketing automation.
What is workflow automation?
Workflow process is a sequence of actions that are triggered when desired conditions are met. These could be any of the following actions:
- Removal of contact from the master list
- Adding contacts to a new list
- Sending an automated email
Why do you need workflow automation?
Gone are the days, when you used to send bulk emails to an entire list of subscribers. Nowadays, subscribers show more attention on those newsletters which are personalized to their interests.
- Workflow process helps you to further segregate your contacts into mailing lists based on subscribers' custom field values.
- It is a perfect combination of contact database, defined conditions and work task especially sending emails to contacts.
Difference between List segmentation and Workflow automation
A segment is a view based on criteria to filter the contacts present in the mailing list. However, in a workflow, contacts are moved from master list to a new list when required conditions are met.
Creating a Workflow Process
At Zoho Campaigns, the workflow process lets you to define conditions to trigger desired actions. This section will take you through the creation of workflow automation.
To set the conditions, follow the steps below:
- Go to Automation tab --> Workflows.
- Click the Create Workflow button situated on right hand side.
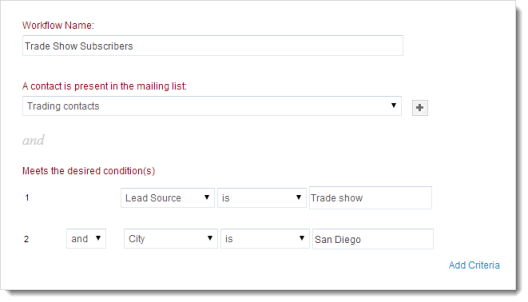
- In the Create Workflow page, enter/add the following information:
- Workflow Name - Give a name to the workflow.
- Select a List - This is the master list which is added to your campaigns’ account.
- Meets the desired condition(s) - Here, you'd define a criteria or set conditions for the action to occur. If a contact meets the defined conditions, it’ll automatically get into the desired actions.
Editing the Criteria Pattern
You want to filter contacts by creating a view, which displays all subscribers from Automobile industry, recently attended a tradeshow and their location is either San Diego or San Francisco.
When you specify the above criteria using the Criteria Editor, the criteria pattern will display as shown below:
The default pattern is (((1 and 2) and 3) or 4).

However,the required pattern is ((1 and 2) and (3 or 4)). This modification can be made using the Change Pattern option. The required pattern is input and saved as shown below:

Note
- You can use the operators AND and OR, round brackets, i.e., (and), and Criteria row numbers to edit the criteria pattern using the Pattern Editor.
Note
- You can define to a maximum of six conditions for a workflow process.
- While setting the desired condition, you can add multiple options in a criteria separated by comma.
- You can edit the criteria pattern by making the changes in bracket positions as well as AND and OR in defined conditions.
- If the specified conditions of a workflow is met, a subscriber would receive only one email as part of workflow action.
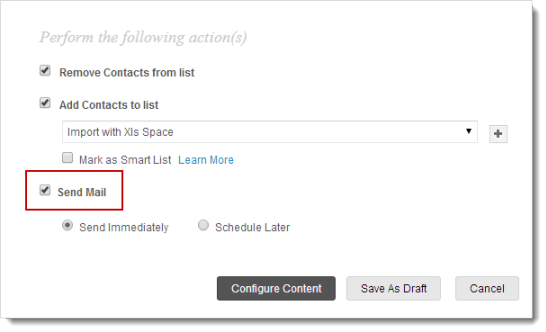
Perform the Following Actions
When the contacts from master list meets the defined conditions, the following actions start taking place.
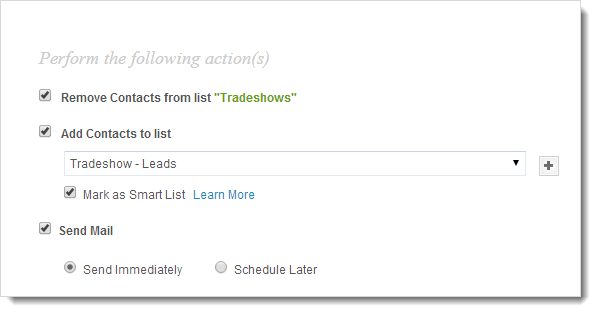
- Remove Contacts from list - Contacts are removed from the master list when they meet the defined conditions.
- Add Contacts to list - Contacts are added to target list when they meet the defined conditions.
- Smart List - A list where cont acts meeting the defined conditions are present. Any other contact added through other sources is automatically deleted.
- Send Mail - An automated email is triggered to contacts meeting the defined conditions. All you need is to add the content for the email and schedule it immediately or at a later time. Once the content is reviewed, you can activate the workflow process from its detail view page.
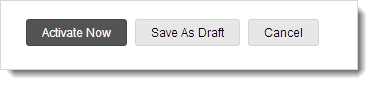
Once the workflow is successfully created, you can proceed with the following actions:
- Activate Now - Click this button to activate the workflow process.
- Save as Draft - Click this button to save the workflow and email content as draft. You can activate the workflow process from its detail view page.
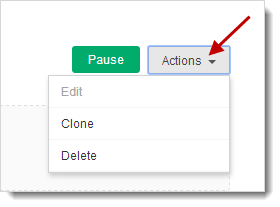
Clone/Edit/Delete Workflow
You can clone/edit/delete a workflow by going to the following path:
- Go to Automation --> Workflow.
- Click the relevant workflow to go to the detail view.
- In the Detail View page, click the Actions button.
- In the drop-down menu, you'll find the options to clone/edit/delete the workflow process.
Workflow Reports
You can view the workflow reports by going to workflow detail view page and clicking the View Reports under relevant action.
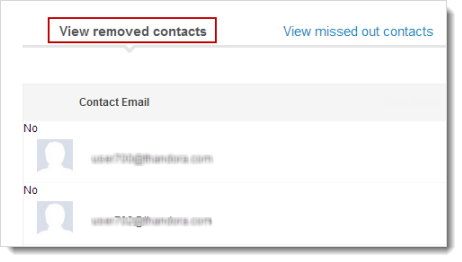
- View Removed Contacts- You can view the contacts removed from the source list via workflow process.
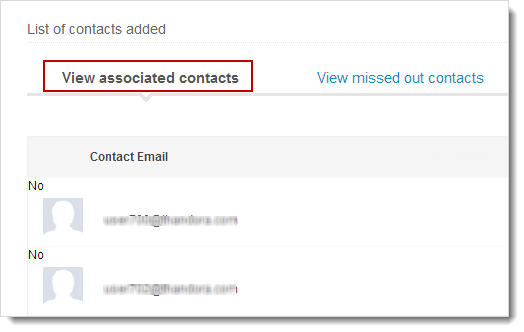
- View Added Contacts- You can view the contacts added to the action list via workflow process.
- Send Mail- You can view the report summary and compare the recipient' activities as given below:
- Recipients - You can view the total number of recipients for your email.
- Opened - You can view the number of contacts who've opened the email.
- Unopened - You can view the number of contacts who are yet to open the email.
- Clicked - You can view the number of contacts who clicked the links in the email.
- Unsubscribed - You can view the number of contacts who've unsubscribed from your mailing list.
- Marked Spam - You can view the number of contacts who've marked your email spam.
- Forwards - You can view the number of contacts who've forwarded your email to their interested friends.
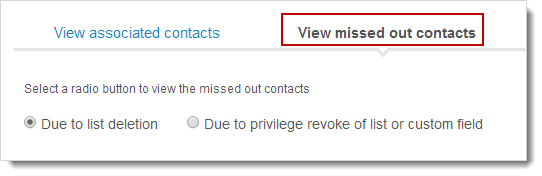
- View Missed out Contacts- When a workflow is termed as inactive, it automatically saves those contacts which were missed due to the inactivation of workflow process. For instance, a workflow can become inactive due to following reasons:
- Due to List Deletion - If a target list is deleted, the "add to target list" action is paused and missed-out contacts are moved to "View missed-out contacts" section of workflow reports. However, a workflow process is stopped when a master list is deleted.
- Due to Privilege Revoke (custom field) - When a privilege is revoked for the custom field present in the master list.
- Due to Privilege Revoke (mailing list) - When the privilege is revoked for a target list, the "add to target list" becomes inactive. However, the workflow becomes inactive due to privilege revoked for the master list.