This is the place where you can view the sign-up form related details ranging from reports, the different thank you pages, sign-up form published on Facebook pages, tracking text, details, etc.
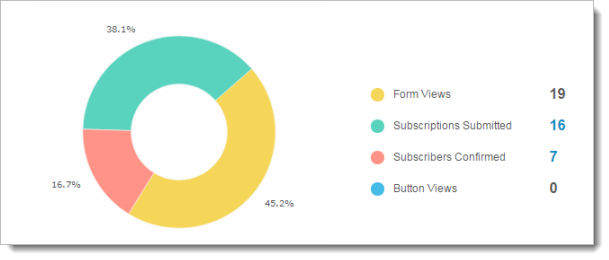
You can view the number of visitors who have viewed the sign-up form and the subscribers who have submitted and confirmed their subscription. The data is represented in the form of numerical data and a doughnut chart to explain the following:
Form Views – This is the number of visitors who have visited the page embedded with the sign-up form. All such visitors are captured and displayed as numerical data.
Submitted Subscribers – The number of subscribers who have completed the sign-up form completion but not yet confirmed their subscription process.
Confirmed Subscribers – The number of subscribers who have confirmed their subscription and have been added as contact to the mailing list.
Button Views – This is a data which provides the number of subscribers who have viewed the sign-up button rather than a direct sign-up form.
Top Five Locations – It tells you the most popular region/country from where the contacts has been subscribed.
Recently Confirmed Subscribers – It lists out the recently confirmed subscribers for that sign-up form.
It lists out the sign-up form details such as different thank you pages configured for the page, sign-up form published on Facebook pages and sign-up codes.
You can track a web page/blog by embedding a tracking text in the sign-up form. This helps you to view the reports based on maximum number of visits to a sign-up form page and analyze which page is the most visited one.
This data is represented in the form of a doughnut chart displaying the different page sources of subscribers.
To add a tracking text in the sign-up form,
![]()
![]()
Once the tracking text is added successfully, you can generate a sign-up form code based on the tracking text and embed the code in the required sign-up page.
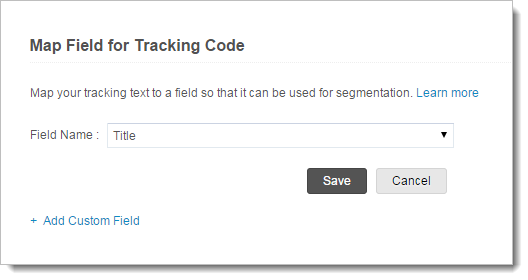
Once you create a tracking text, you can map the tracking text to a custom field in your mailing list. Later, you can create a segment to filter the contacts originating from a particular web page/blog and send an email campaign to such subscribers.
To map tracking text to a contact field,