How Can I...up
Subscription
To make your subscription process easy and swift, you have the provision to subscribe, upgrade or downgrade to plans whenever you wish to depending on your requirement, by just a few clicks from the application itself. Your list(s) are bound to grow with good email marketing and an option to upgrade to plans from the application itself makes things only easy for you.
- Click Settings tab --> Subscription
- Click Subscribe --> make payment and make sure you agree to the terms of service
Note:
- Only admins of every account has access to modify subscription plans.
- When you downgrade from plans, please note that your plan will not automatically be subscribed to the free plan.
Company Profile
Your company's profile is essential for both, internal billing as well as for your subscribers information. This page allows you to enter information relating to your company profile. The information you enter will be used in your campaign footer. This is to let your subscribers know they are receiving emails from a genuine source helping you reduce the no. of spam complaints improving your reputation.
- Click Company profile
- By default, the Company name and address that you had entered will be displayed.
- Enter the remaining information and click Update. (Refer table below)
| Fields | Description |
| Name | Enter the name of your company |
| URL | Enter your company's website address |
| Phone | Enter your company's phone number |
| Address | Specify the company address with city, state, zip code, and country details. |
| Brand Logo | Click Browse and select your company logo |
Note :
- Company Name and Address are mandatory fields.
- You can at anytime edit the given info.
- The Name and Address will be sent in your email footer.
Merge Tags
Merge tags helps you personalize your campaign by letting you address your subscribers with their first name, last name and more.
As mentioned in this document - Merge Tags, there are two types of merge tags that can be used:
- Pre-defined tags
- Click Merge Tags
- Copy, paste the tag you wish to use in your content
- Alternatively,
- Start creating your email campaign, at the editor all you need to do is first decide, how you want to address your subscribers. Decide whether email, first name or last name.
- Click on the tag you want.
- Once highlighted, copy and paste the tag in your content.
- Click Save & Close
for e.g., If you want to address your subscribers with their Last Name, click on the tag $[LNAME]$ or $[LNAME|Customer|Guest]$ and copy, paste the tag in your content configuration field.
User Defined Tags
The flow of using these tags in your content is pretty much the same, except that you need to create a set of tags. In user defined tags, please note that you can choose from two different fields:
User defined field
Contact Custom field - Only if you've created custom fields, will it be displayed in the drop down list at the time of selection.
Account Custom field
- Click Merge Tags
- Select the type of field and field name at the user fields drop down menu
- Define Merge Tag
- Define a mail default value
- Define a social default value and Save to reflect changes
Please note that, during campaign creation, in the text editor, selecting a user defined field at the drop down list will be possible only if you’ve created a custom field.
The tag created, will be displayed below user defined tags during content configuration. To use, during content configuration:
- Select User Defined Tags
- Click on the tag you want
- Copy and paste the tag in your content
- Click Save & Close
for e.g., If you want to address your subscribers with their secondary email address copy, paste the tag in your content $[UD:SEC]$ or $[UD:SEC|ABC|CBA]$
However, we suggest you go through a detailed documentation of Merge Tags.
Note:
- Not all tags will consist of default values.
- Only contact detail tags will consist of default values.
- Header & Footer tags will not function in social media campaigns.
- Header & Footer tags should be given in href tags (in case of a HTML campaign, to be displayed in your own text), else, the URL itself will be displayed. e.g., <a href=$[LI:UNSUBSCRIBE]$>Unsubscribe</a>
- Header & Footer tags to be used in plain text campaigns can be used as it is. (The URL itself will be displayed).
- Only 45 custom fields are allowed per organization.
- Editing a custom field will affect existing tags. You can either disable or update the tag.
- Deleting tags will display tag format itself in your email campaigns.
- While defining a merge tag, the only characters allowed are _ and : . Other special characters are not allowed.
- A merge tag that is defined cannot be edited whereas, it can be mapped to some other field.
- In case you want a hyperlink in your content, use either Insert Link from our editor or use the tag in your HTML.
Custom Fields
Why just the same old basic default contact details? Create custom fields to collect additional contact details of your subscribers and customize according to your need.
- Click Custom fields
- Select Field Type
- Enter Display Label and the length of the field
- Click Add to apply custom field
Campaign Themes
At Zoho campaigns, we provide an option to create themes where you can change background color, alignment for your Header & Footer & opt for other customizations such as center alignment of your email content and sharing the email Campaign on social pages, thus, making the Header & Footer settings more relevant or identifiable to the background color of your email campaigns or organization. Let’s figure out how to create a new theme custom made for your Campaigns?
Create Theme
To create your own theme, from the Settings tab, in the Campaign Themes section, click Add New Theme button. A page for naming the new theme appears.
Note:
- For first time users, you'll have the option to "Create My First Theme" rather than "Add New Theme".
Add a new campaign theme: Give a name to your new theme. Set your created Campaign Theme as a default one.
Note:
- Once you set a theme as default, it'll get associated to all your Campaigns.
Clone Theme: This is an option to duplicate the background color, font style & size, alignment and other customizations from a previously created Campaign theme.
Clicking the Create button which will lead you to Customization page.
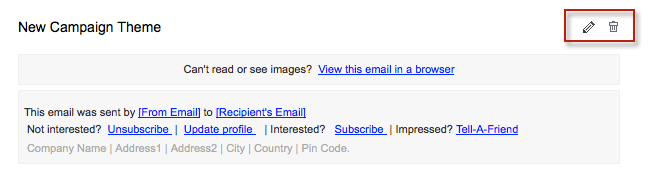
Header & Footer Links Customization
In Header & Footer, you can find the display links which determines the background information such as sender of the email and also provides the usability of the document to end customers through quick links.
You can choose any of these below links necessary for your email campaigns.
- View in Browser Option: This is the banner of an email Campaign and provides an option to open the email in a separate browser.
- Update Profile: This option allows the customer to update his profile.
- Subscribe: This option allows the recipients for receiving email notifications, updates and newsletters.
- Tell-A-Friend: This option allows the recipient to forward a friend about the content.
Any theme, apart from these links, includes background color, font style & size which are pivotal and provides the solid base to it. Let’s explore the different ways to add color and font to the theme.
Color & Font Customization
Make your changes to the header or footer by using the options on the right side. For example, you can change the font, size, or apply a different font color. You can customize the Header part and customize the same across the Footer by checking the box “Same as Header Customization.” In this way, you can create a header and footer that appears the same on every page, or you can customize the page with different header and footer options.
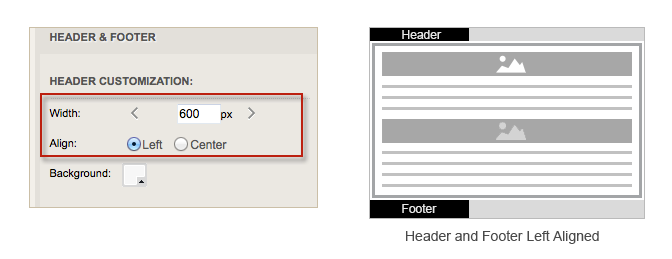
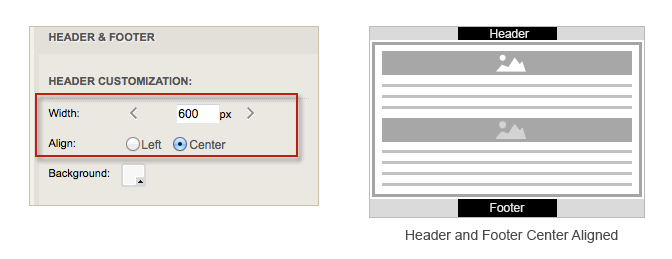
- Ribbon: You can increase or decrease the width of the ribbon of Header & Footer.
- Align: You can either align the message to the left or center of the ribbon.
- Background: You can change the background color of the ribbon.
- Border: You can change the border color of the ribbon.
- Text: You can change the color, font size & style of the text in the ribbon.
- Link: You can change the color, font size & style of all links.
Other Customization
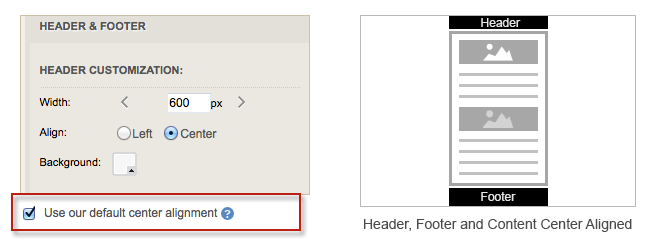
We also provide a few options to change the alignment of your content and to enable social plugins to share your campaign on social sites.
Use our default center alignment: This is an option to align your email content to the center. It has been found that the readability of content is high when the content is centrally aligned.
Use our social plugins: It is an add-on which provides the option for your recipients to share their email on social pages.
Sender Address
This applies to the Sender's email address and reply to email address. You will for sure want to use other sender email addresses for a lot of your campaigns and not necessarily use your own email address every single time. For security reasons, as a stringent measure to thwart any possibility of Zoho Campaigns being used as a SPAM tool, we have made it mandatory to use only verified email addresses. Zoho Campaigns ensures you are using the correct email address and the respective owner is also aware of your usage. To verify:
Click Sender Address.
In the Add Sender Address page, do the following:
- Enter the Email Address in the text box.
- Click Send Verification Email to verify respective email address prior to usage.
- A verification ink will be sent to the respective email address, which, when verified by clicking will be listed in the drop down list during campaign configuration.
Alternatively,
While you configure your campaign content, you can send verification email at the time of selecting Sender Email Address. All you need to do is:
- Click Add Sender Address
- Enter the email address and click Send Verification Email
Note:
- The email addresses that are verified are listed in the From Email Address and Reply To Address options while creating campaigns.
Integrations
You can share your email campaigns on social platforms to increase your campaign reach and to create more awareness about your organization, products and services. Though we are the ones sharing your campaigns socially, your customers, fans and friends would see the post from you, from your name and not us. Yes, all the campaigns are socially shared by us on your behalf.
To Integrate your social accounts with Zoho Campaigns:
- Click Integrations
- Click Associate Account
If you aren't logged in yet,
- Facebook- Enter Login credentials
- Click Login
- Click Allow (for first time users) - This is mandatory for successful integration of your account.
- Twitter- Enter Login credentials
- Click Authorize App - Authorization is mandatory for successful integration of account.
- LinkedIn - Enter Login credentials
- Click Ok I'll Allow it - This is mandatory for successful integration of your account.
If you're already logged in using the same browser,
- Facebook - Will automatically get associated
- Twitter - Click Authorize App - Authorization is mandatory for successful integration of account.
- LinkedIn - Click Continue
Continue button in the above represented image must be clicked for further processing of successfully integrating your Facebook account with Zoho Campaigns and this particular page is applicable only to Facebook which will be displayed only once only during the time of associating your account for the very first time.
At any given point, if you feel the need to deny access to these social accounts, you can do so by clicking Settings tab --> Integrations --> Deny access and in case you wish to change the account, Settings tab --> Integrations --> Change account.
Note:
- Request permission page on Facebook will be displayed only once.
- Your Facebook pages associated to your account will be associated to your Zoho Campaigns account.
- Your login credentials are not misused by Zoho Campaigns.
- We socially share all campaigns on your behalf, which means your fans, and friends will find the posts from you yourself.
Google Analytics
- Click Settings tab --> Integrations
- Click Associate Account
- Click Grant Access
If you are already logged into Google using another account, you can associate the actual Google account you want to associate with Zoho Campaigns at the Grant Access page.
Now that you've associated your Google Analytics account with Zoho Campaigns, please make sure you select the "Add Google Analytics to tracks URLs in your campaign" option during campaign creation to successfully view analytics in Zoho Campaigns itself.
By any chance if you don't associate your account with Zoho Campaigns, you can still view Analytics. The only difference being, you will have to:
- Login to Google Analytics
- Create a segment with the campaign name to view analytics of data related to the respective campaign.
Note:
- You will have to create the segment with the campaign name after you send the campaign.
- Selecting the "Add Google Analytics to track URLs in your campaign" option is common for both cases.
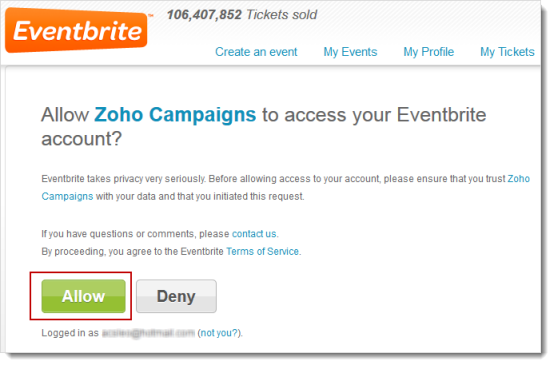
Integration with Eventbrite
Zoho Campaigns integrates with Evenbrite where you can select your events in your email campaigns. Eventbrite users can integrate their account with Zoho Campaigns and can add their events to your email campaigns.
To integrate your Evenbrite account
- In the Settings tab, Click Integrations option.
- In Integration page, Click the Associate Account related to Eventbrite option.
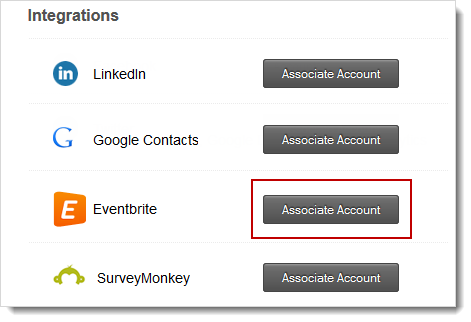
- You’ll get a popup message with Authorize option. Enter your Eventbrite Credentials and click Authorize to proceed.
Learn more on how to create a Eventbrite campaign.
Integration with SurveyMonkey
Zoho Campaigns integrates with SurveyMonkey where you can select your surveys in your email campaigns. It not only provides the valuable feedback of your service but you also get the pulse of the market for your future strategies. SurveyMonkey users can integrate their account with Zoho Campaigns and can add their online surveys to your email campaigns.
To integrate your SurveyMonkey account
- In the Settings tab, Click Integrations option.
- In Integration page, Click the Associate Account related to SurveyMonkey option.
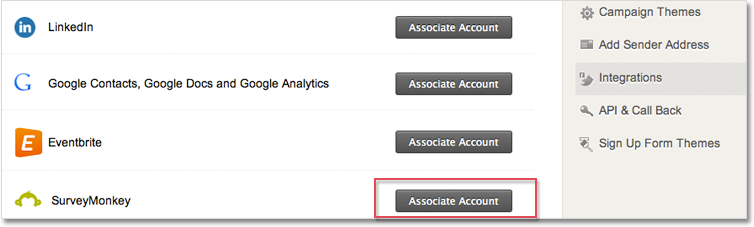
- You’ll get a popup message with Authorize option. Enter your SurveyMonkey Credentials and click Authorize to proceed.

Learn more on how to create a SurveyMonkey campaign.
Integration with Zoho Survey
Zoho Campaigns integrates with Zoho Survey to send your survey to the subscribers via email campaign. Now, you can create user-feedback form, customer satisfaction survey, Multiple choice questions, opinion polls and send it via Zoho Campaigns.
Learn more on how to create a Zoho Survey campaign.
API & Call Back URL
API's gives you access to different operations under Campaign Management and List Management without having the need to login every single time you need info relating to these operations. Various views using API's are:
List Management:
- Contact Subscribe
- Contact Unsubscribe
- Total Contacts
Campaign Management:
- Recent Campaign
- Recently Sent Campaign
- Campaign Reports
- Click API & Call Back --> Generate API Key
- Click Save
We suggest you go through a detailed documentation of API keys.
Signup Form Themes
We've enabled an option for you to design some colorful themes for your signup forms to match the design of your website, so that your subscriber sees consistency in what you do. Give your subscribers a feel good factor while signing up. Use different style and color to attract your website viewers. This can convince your want to be subscribers actually subscribe to your newsletters and more!
- Click Signup form themes
- In the Add New Theme page, click New Theme to create a new theme and enter theme name
- Select the check the box to Save as default theme, only if you want to save the respective theme as default theme for your list(s) and make sure you save your theme name.
- In the Preview for signup page, click Browse and select the image file (your brand logo) you want to upload
- Configure necessary changes in the signup form and click Save to save your configuration
- On the top of your page, to your right, from the customization page drop down list box you've an option to select the signup form, thank you page, signup embed button and the signup embed form and make necessary changes you need
- Click Save
- At any time, we let you preview your signup form with the theme you have designed which will help you to either apply the respective theme or make changes to the theme.
- Click Preview to have a look at your designed theme
- Click Save if you've decided on the theme you're interested in applying for your signup form.
- The Save button is an editable button, which means you can customize your content in the respective button and you don't have to stick to what we display.
Note
- You can create multiple themes that can be applied to multiple lists.
- The first theme you create will be the default theme. If you don't create a theme, the general theme will be used.
- A default theme cannot be deleted.
- If you want to delete a default theme, create another theme as default and delete the theme you want.
- Images are loaded in a default size in Zoho Campaigns. To view the actual size of an image, click preview with logo.
- The signup form you view during theme configuration is only a sample signup form provided for theme creation.
- You can apply a theme to any mailing list and have a look by clicking the preview button of the respective mailing list signup form.
- Avoid removing the tag $[ML:LISTNAME]$, since it is used to replace the list name.
- Thank you message will be displayed only after successful signup.
Related FAQs
1. Is there a way to include “UNSUBSCRIBE” in my own template?
To use the unsubscribe link inside your custom field, kindly copy the merge tag $[LI:UNSUBSCRIBE]$ from mail merge tags which is present on the right hand side of the HTML editor. Please note that these tags should be given in href tags (in case of a HTML campaign, to be displayed in your own text). e.g., Unsubscribe
2. How can I’ve footer links in any other language?
Yes, you can update the header & footer settings in other languages. To update: 1. Click the Settings tab > Campaigns Themes. 2. In the All Themes page, click the edit icon. 3. In the Customization page, update the specific content under the Preview section.
3. Can we eliminate the piece at the top of the emails that reads "Can't read or see images? View this email in a browser"?
Yes, you can turn off your header & footer settings. To turn off: 1. Click the Settings tab > Campaigns Themes. 2. In the All Themes page, click the edit icon (dia). 3. In the Customization page, uncheck the Header (View In Browser option) option under the Header Text & Preview section. Your header & Footer will be turned off.