How to setup SPF/ Sender ID and Domain Key/ DKIM text records in your domain's DNS settings?
We highly recommend our users to add the SPF and DKIM records for your domain. It is very easy to add the records, all you've to do is to go to your Domain-hosting/ Web-hosting website and login to your account to add the records. We've provided the steps of some of the most popular Domain-hosting/ Web-hosting websites. However, if you are not able to find the steps related to your Domain-hosting/ Web-hosting website, please contact your Domain-hosting/ Web-hosting websites.
Alternately, you can also contact your system administrator/ network administrator to configure the SPF and DKIM records in the DNS settings of your domain.
Note
- To add the DomainKey/ DKIM public key, you need to create a subdomain in your domain’s DNS settings.
Below are a list of commonly used domain/ web-hosting sites and the instructions for adding our server (zcsend.net) to their TXT records.
GoDaddy
To setup SPF
- Log in to your account at www.godaddy.com by clicking the My Account tab.
- Go to the Zone File Editor for the domain name you want to update.
- Click Add New Record. The Add DNS Record window displays.
- From the Record type list, select TXT (Text).
- Complete the following fields:
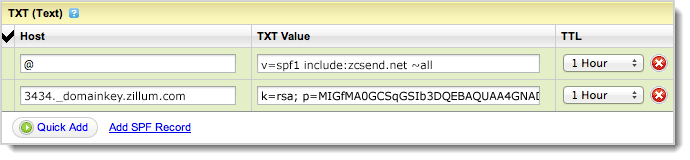
- TXT Name — Enter the host name for the TXT record. For example, type @ to map the record directly to your domain name. (This field is labeled Host in the TXT (Text) section of the Zone File Editor.)
- TXT Value — Enter the value you want to assign to the record (e.g. v=spf1 include:zcsend.net ~all).
- TTL — Select how long the server should cache the information.
- Click OK.
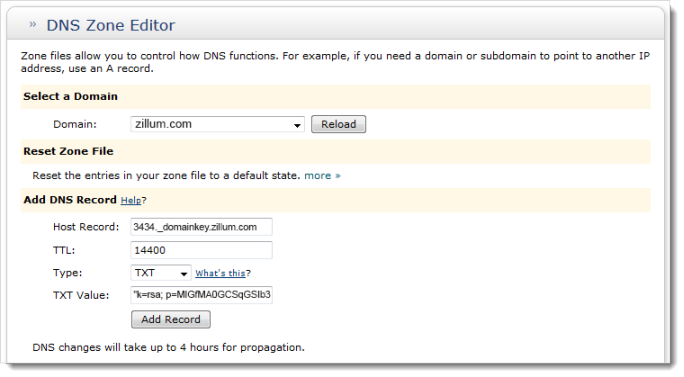
To setup DKIM/ Domain key
- Log in to your account at www.godaddy.com by clicking the My Account tab.
- Go to the Zone File Editor for the domain name you want to update.
- Click Add New Record. The Add DNS Record window displays.
- From the Record type list, select TXT (Text).
- Complete the following fields:
- TXT Name — Enter the subdomain of your host name, such as www or ftp. (e.g. “3434._domainkey.zillum.com”) (This field is labeled Host in the TXT (Text) section of the Zone File Editor.)
- TXT Value — Enter the value you want to assign to the record (e.g. k=rsa; p=MIGfMA0GCSqGSIb3DQE).
- TTL — Select how long the server should cache the information.
- Click OK.
HostGator
To setup SPF
- Log into your Control Panel and click the Advanced DNS Zone Editor icon (if you do not have this icon, contact HostGator to request for it)
- Select the desired domain name from the dropdown menu
- Under Add a Record, enter the following information:
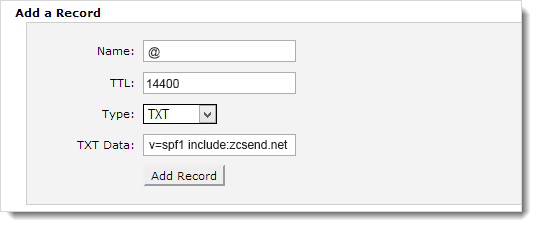
- Name: type your domain name (e.g. zillum.com)
- TTL: 1400
- Type: TXT
- Address: " v=spf1 include:zcsend.net ~all"
- Click the Add Record button.
To setup DKIM/ Domain key
- Log into your Control Panel and click the Advanced DNS Zone Editor icon (if you do not have this icon, contact HostGator to request for it)
- Select the desired domain name from the dropdown menu
- Under Add a Record, enter the following information:
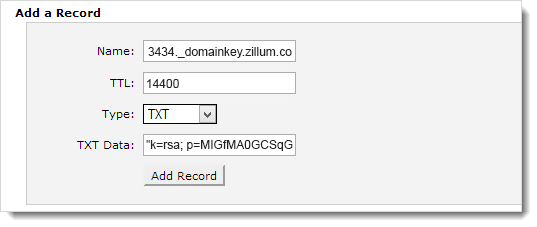
- Name: type your subdomain domain name (e.g. 3434._domainkey.zillum.com)
- TTL: 1400
- Type: TXT
- Address: "k=rsa; p=MIGfMA0GCSqGSIb3DQE"
- Click the Add Record button.
HostMonster
To setup SPF
- Log into your HostMonster Control Panel.
- Select the "DNS Zone Editor" icon in the "Domains" section.
- Select the domain you're modifying from the drop-down box.
- Scroll down to the heading named "Add DNS Record".
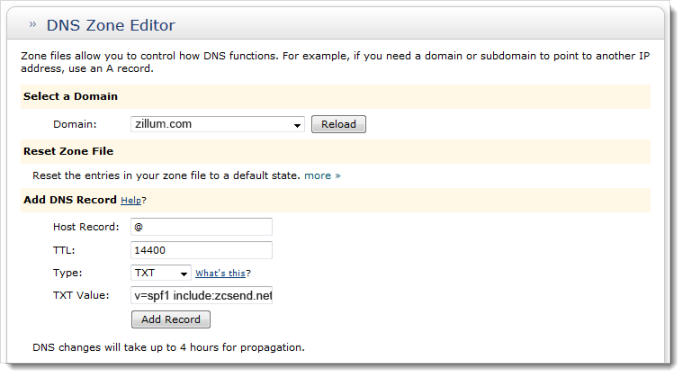
- Host Record: Enter @ for your main domain.
- TTL: Keep the default value: 14400
- Type: Select the TXT type
- TXT Value: Enter here your SPF record ( v=spf1 include:zcsend.net ~all)
- Click on the “Add Record" button to create the record.
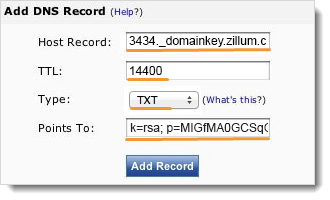
To setup DKIM/ Domain key
- Log into your HostMonster Control Panel.
- Select the "DNS Zone Editor" icon in the "Domains" section.
- Select the domain you're modifying from the drop-down box.
- Scroll down to the heading named "Add DNS Record".
- Host Record: Enter your subdomain (3434._domainkey.zillum.com)
- TTL: Keep the default value: 14400
- Type: Select the TXT type
- TXT Value: Enter here your DKIM/ domain key record ( "k=rsa; p=MIGfMA0GCSqGSIb3DQE")
- Click on the “Add Record" button to create the record.
Bluehost
To setup SPF
- Log into your site’s Control Panel (e.g. login.bluehost.com).
- Select the DNS Zone Editor icon in the Domains section.
- Select the domain you want to modify from the drop-down menu.
- Scroll down to the heading named Add DNS Record.
- In the Add DNS Record area, enter your new DNS entry such as:
- Host Record: Enter @ for your main domain
- TTL: Keep the default value: 14400
- Type: Select the TXT type
- TXT Value: Enter here your SPF record ( v=spf1 include:zcsend.net ~all)Click Add Record to create your record.
- If you already have an SPF record, scroll down to the TXT (text) area to edit the one you already created, do not create two SPF records.

To setup DKIM/ Domain key
- Log into your site’s Control Panel (e.g. login.bluehost.com).
- Select the DNS Zone Editor icon in the Domains section.
- Select the domain you want to modify from the drop-down menu.
- Scroll down to the heading named Add DNS Record.
- In the Add DNS Record area, enter your new DNS entry such as:
- Host Record: Enter your subdomain (3434._domainkey.zillum.com)
- TTL: Keep the default value: 14400
- Type: Select the TXT type
- TXT Value: Enter here your DKIM/ domain key record ( "k=rsa; p=MIGfMA0GCSqGSIb3DQE")
- Click Add Record to create your record.
Justhost
- Log into your site’s Control Panel (e.g. login.bluehost.com).
- Select the DNS Zone Editor icon in the Domains section.
- Select the domain you want to modify from the drop-down menu.
- Scroll down to the heading named Add DNS Record.
- In the Add DNS Record area, enter your new DNS entry such as:
- Host Record: Enter @ for your main domain or your subdomain ("mail" for mail.example.com)
- TTL: Keep the default value: 14400
- Type: Select the TXT type
- TXT Value: Enter here your SPF record ( v=spf1 include:zcsend.net ~all).
- Click Add Record to create your record.If you already have an SPF record, scroll down to the TXT (text) area to edit the one you already created, do not create two SPF records.
Register.com
- Log-in to your domain manager.
- Click on your domain.
- Under DNS Settings-->Select TXT records (SPF)
- Enter the Host Name and TXT Value "v=spf1 include:zcsend.net ~all".
- Click continue
Networksolutions.com
- Log-in to your domain manager.
- Under 'My domain names'-->Edit DNS-->Edit Advanced DNS Settings-->Edit TXT records.
- Enter the Host and Text " v=spf1 include:zcsend.net ~all ".
- Click continue.
- Click Save Changes in the next page that appears. Ignore the warning message that appears.
Ipage
- Log into the Control Panel with your account username and password
- Click on Domain Central under the Domain section
- Select the domain name for which you want to manage the TXT/SPF records
- Click on DNS
- Select TXT/SPF Record from the Modify dropdown menu.
- Type in “v=spf1 include:zcsend.net ~all” and click Add to proceed.
Arvixe
- In your control panel, click on Domains and then on the domain name in question.
- Now click on Edit DNS zone records.
- First, delete the default TXT record by clicking the Red X to the right on the respective row.
- Add the following SPF record to your DNS zone.
- Click Add record, pick TXT from the drop-down box, copy/paste the record into the Record Data field “v=spf1 include:zcsend.net ~all”.
CloudFlare
- Go to CloudFlare.com >> My Websites.
- In the Settings (pull down menu) page, Go to DNS Settings.
- Add the new TXT record " v=spf1 include:zcsend.net ~all".
Name.com
- Log-in to your domain manager.
- Click on Account (at the top) -->Click on your domain.
- Under Control Panel-->Click on DNS Record Management.
- Click the drop down menu and select TXT.
- Enter the Record Host and Record Answer " v=spf1 include:zcsend.net ~all".
- Click OK.
