A SubForm is a form within a form. The primary form is called the MainForm, and the form that is inserted in it is called the SubForm. SubForms are generally used to show data from tables that have a one-to-many relationship. For example you would use a SubForm if you wanted to display an order with the order details. In this case, the order information would display on the SubForm. The data in the order table is the "one" side of the relationship. The data in the Item table is the "many" side of the relationship — each order can have more than one item. The sample application "Order Management" illustrates the SubForm feature.
Zoho Creator supports the "SubForm" field type using which you can insert a SubForm into your MainForm. Please find the steps given below to create a SubForm.
Add the required Forms to your application from the dashboard page by selecting Create New -> Form option. For example, add the "Items" form to enter the Items ordered and the "Order" form to enter details about each order. Here, "Order" form is the MainForm and "Items" form is the SubForm.
In the edit mode of the MainForm, simply drag-n-drop the SubForm field type at the required position in your editor area. For example, drag-n-drop the "Items" form into the "Order" form.
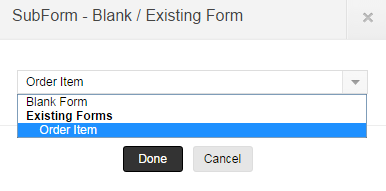
In the Adding SubForm screen, a dialog box appears where you have to select the Form to be added as the SubForm field and click on Done. For example, select the "Order Item" form in the "Order Management" application as the SubForm. Click Done to insert the SubForm to the MainForm. You can also select the Blank form option and directly create the SubForm within the MainForm.
The SubForm will be inserted into the MainForm as shown below: 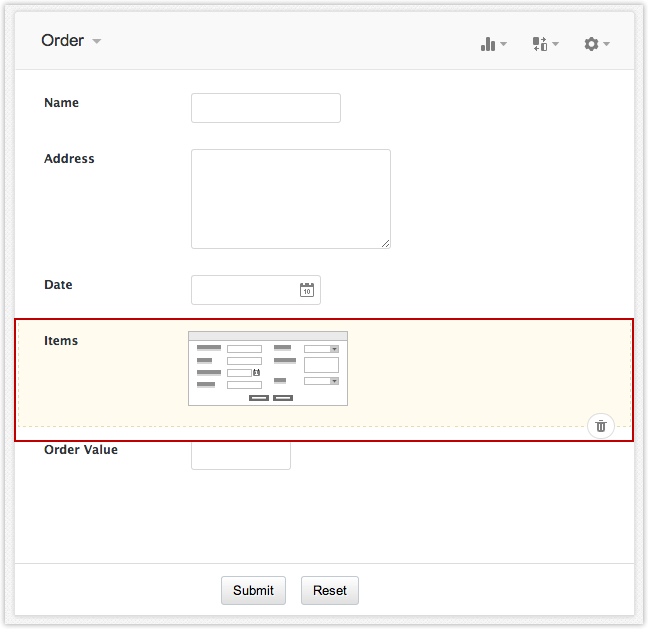
When you access the application, the SubForm will be displayed within the MainForm, as shown below. Here, the "Order form" displays the "Items" SubForm to add the items ordered. You can use the "Add +" or the "Add New" button to add entries to the MainForm from the SubForm. 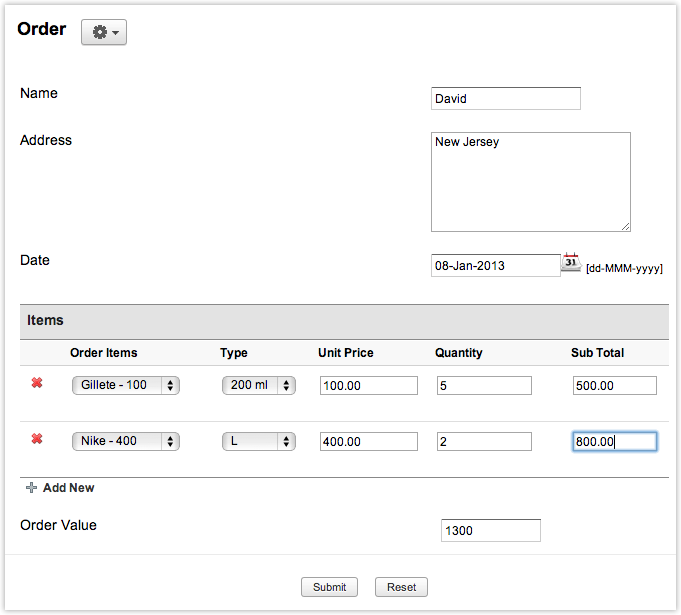
The MainForm report, (Order View) will display all the orders with the values of the selected SubForm fields, as shown below. 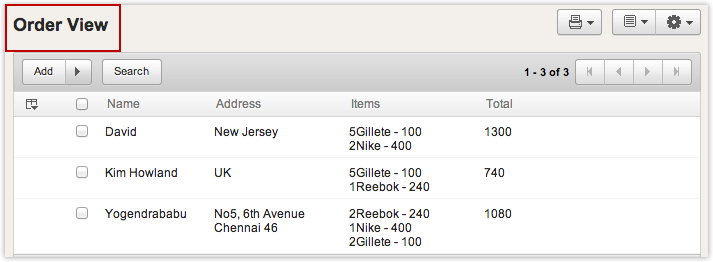
The Column Properties option in the MainForm report is used to configure the SubForm report and the SubForm fields to be displayed in the report, as shown below.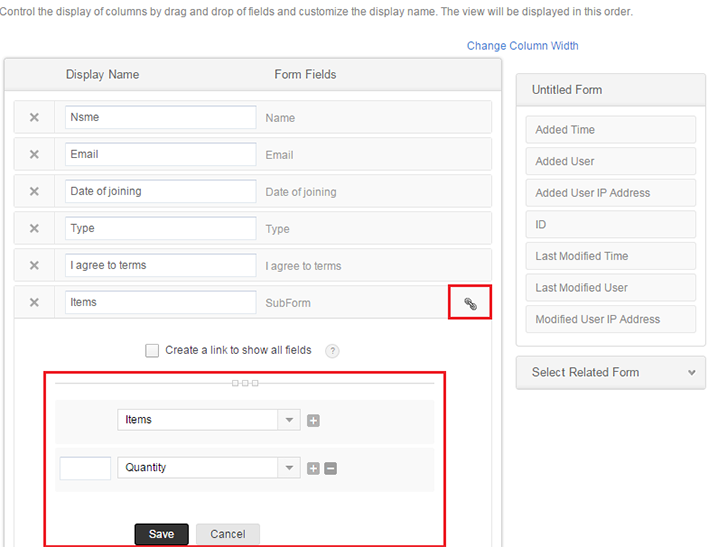
Create a lookup in the SubForm and relate it to the parent form. Once the lookup field is created in the child form, that field can be used as relationship field between the two forms. When adding the lookup, select the existing SubForm relation and pick the ID field, as shown in the image attached. 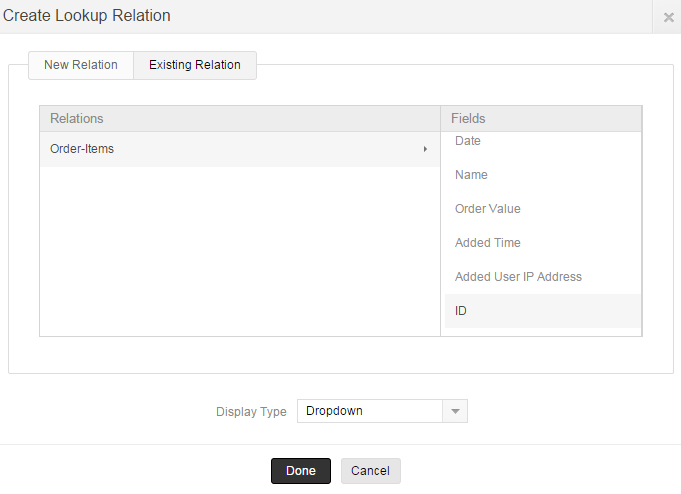
Select the SubForm report from the Reports tab, click on "Column Properties" and select the lookup field created above and click on "Link " button, to create a link to the MainForm data.
You can set the "Default Entries" and "Maximum Entries" for a SubForm field type from the "Appearence" section under the field properties tab of the SubForm field.
Lets assume we have a MainForm named "Orders" form and a SubForm named "Items" SubForm. To export MainForm data with SubForm,

<a href="https://creatorexport.zoho.com/<adminuser>/<appname>/xls/<viewname>/exportDisplayData=false
For example : https://creatorexport.zoho.com/sampleapps/export-data/xls/Order_Report/exportDisplayData=false
To import data from an XLS file into a Form with SubForm, the XLS file must contain the MainForm data and SubForm data in separate tabs and the columns must be in a specific format.
a. Creating the XLS file in the specific format
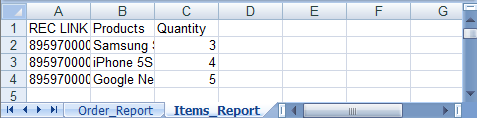
An easy workaround to create this XLS file will be to add a sample record into the Form with SubForm and then export this data in XLS format, as specified in the section Export MainForm data with SubForm. For example, the XLS file generated by exporting MainForm named "Orders" and a SubForm named "Items", will be in the format as explained below.

b. Importing the data
To customize the size of the fields within the SubForm:
Go to SubForm Field properties -> Field width customization -> Adjust field width manually 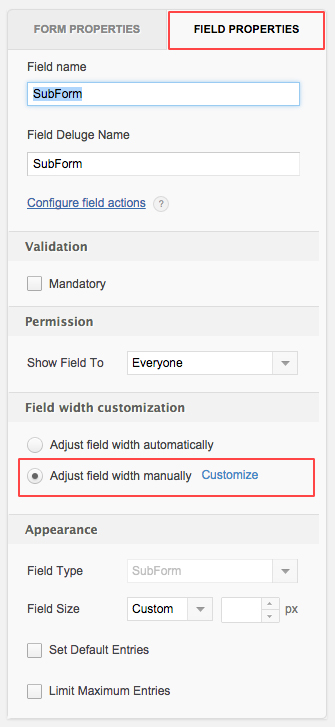
In the popup window, select the required field size and click on Done to save the changes.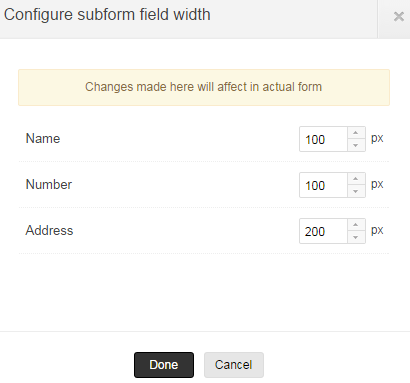
Note
The SubForm layout size can be customized from SubForm Field Properties -> Appearance -> Field Size.
The Subform name represents the entire collection of records in a SubForm. ID value will be available only after the SubForm record gets persisted in the database. The expressions <collection>.<subform_name> will return another collection. A row is a pre-defined variable available in on add row, on delete row and on user input action of a SubForm field. You can access, update and dynamically append or clear values of SubForm field using a row.
The following field action script is supported for SubForm field types, as shown below.
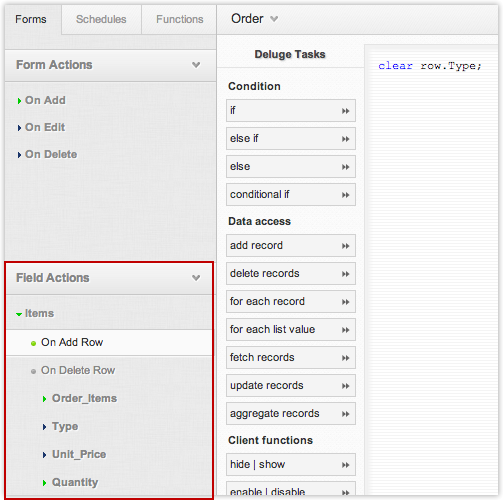
The following Field Action Script is supported for all the fields within the SubForm.
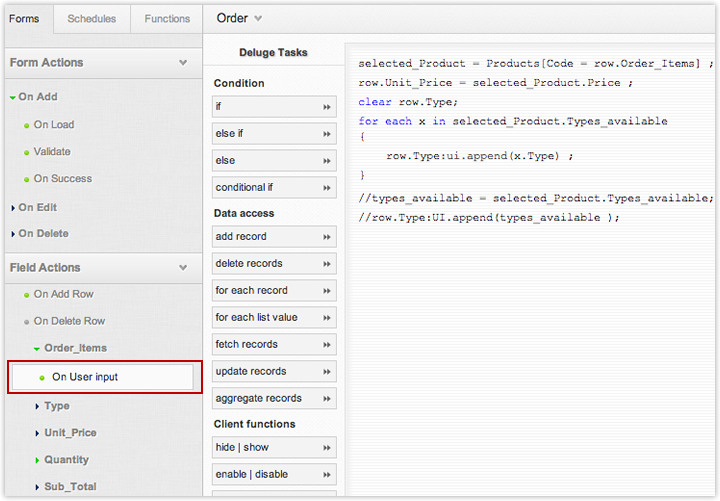
You can add items to a picklist in a SubForm using the UI.append task. Refer this help topic for syntax and sample code.
To add items to a picklist in a SubForm based on selection in MainForm:
Changing the selected Client after adding the SubForm rows will not reload the employees list. A script to limit the options is given below. This script should be added to the on user input block of the client_field.
You can Hide and Disable SubForm fields in theon load action of MainForm andon user input action of MainForm fields.The syntax for hiding and disabling SubForm field is as follows:
hide <SubForm name>.<field name>;
show <SubForm name>.<field name>;
enable <SubForm name>.<field name>;
disable <SubForm name>.<field name>;
The above tasks when executed perform the operation on entire column. For ex, when hide task is applied on SubForm field, it hides the entire column in the SubForm grid.
You can use the following script to populate a field in the SubForm with the value of the field in the MainForm. In the "On Add Row" task of the SubForm, give the script as
row.SubFormField = input.FormField;
The Sample application SubForm in HTML View opens a HTML view on submit of a record in the Employee Form. The on add ->on success script added to the Employee Form, calls the HTML view named “Print” using the OpenUrl task. The HTML view prints the record with the SubForm data.
Copy the application to your account and view the script,
To send SubForm data in an email, you can iterate the SubForm data and concatenate with the message of an email. Please find the sample code format given below:
The Sample application Subform Details in Email comprises of a Student Form which is a parent form with SubForm. A script is added to the on add ->on success of the “Student” form to send email with SubForm data
You can add multiple attachments to a record, using SubForm feature. Create a form with a single “File Upload” field type and add it as a SubForm field to your primary form, to add multiple attachments per record.